


Story and photos by Dave Spinnenweber
Editor’s Note: Iron Trader News – and IronWorks before it – respects people who make things work; the doers, the fixers, the makers among us. Tradespeople and practitioners of the industrial arts are problem solvers, people who talk it over, think it through and aren’t afraid to weld or grind till they figure it out.
So in praise of this can-do attitude, we present the Blue Collar Blackline Project. Dave from Pittsburgh, PA embarked on this path with the goal to cobble up a handsome, capable bike that apologizes to no one for its sleek looks, brilliant function or fiscally responsible approach. In other words, it’s real.
Here’s the first installment. Follow along at www.IronTraderNews.com and on ITN’s Facebook page.
Blue collar work… It’s what keeps the lights on, cars running, toilets flushing and buildings built. The hours are long and often unpredictable, with work days that rarely align with family, schools, or events. As a heavy equipment operator/mechanic, I experience all of these woes and more; I bet many of you reading this know them all too well. It’s no surprise that I, like many others in the trades, have found myself single at 40 (happily divorced, as I say), making the most of time with my kids, and looking for something to do with sparse free time.
One day last year, I decided I should have a bike. It would be a hobby that would also get me to work 6-7 days a week, making my commute fun. This would fit seamlessly into my life and make work just a bit more enjoyable. That leads us here, to the Blue Collar Blackline.
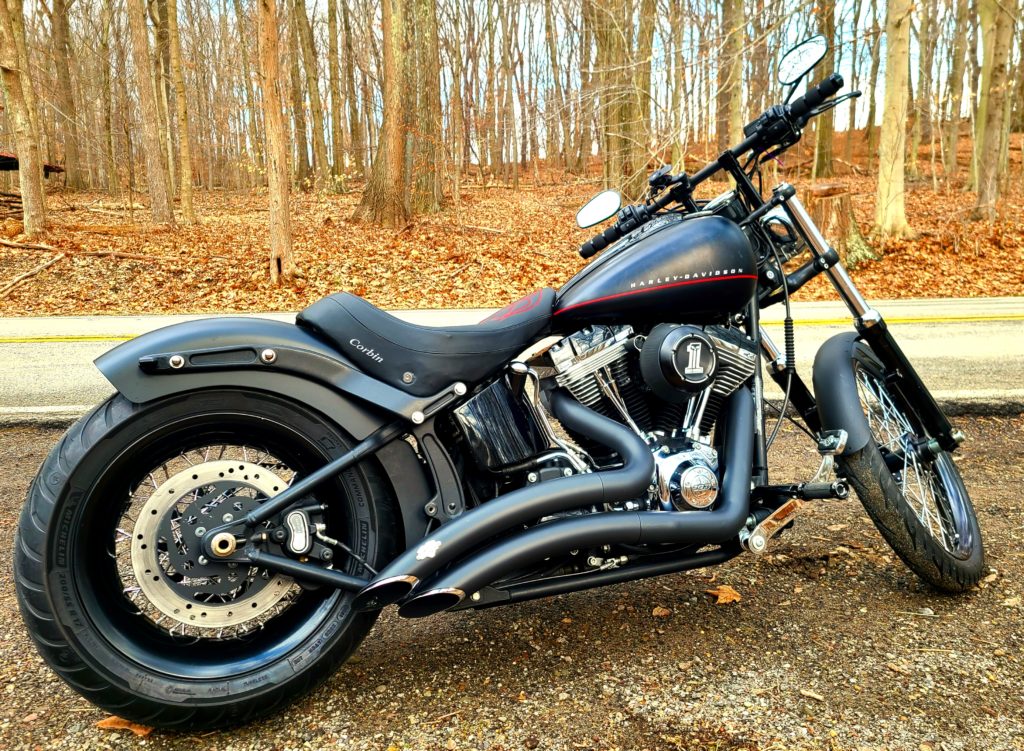
I started my search for a bike as many do, on the internet and talking to coworkers. In my line of work, there’s no shortage of riders, many of the bar shield persuasion. At 40, I knew my days being crouched at 100MPH+ were past me; it’s hard enough to get out of bed without a new pain showing itself. Deciding on a cruiser and respecting my budget I started browsing the Softail listings as the baggers just aren’t my style. Before long I stumbled upon a 2012 H-D FXS Blackline with just under 30,000 miles, just an hour after it was listed. There was something about this bike, that stood out, even from the other Blacklines. It was the right color, it had the exhaust I wanted, and moreover… it was exactly what I was looking for even if I didn’t know where it was gonna end up.
I made contact with the seller, a wonderful woman in her 60’s from Georgia, and we started talking about the bike’s history, why she was selling, etc. We agreed on a price and all seemed well. When it came to making the payment and taking delivery, she was insistent that we meet in person – a commitment since I live in Pittsburgh, not exactly close by. Not wanting to lose the bike, I recruited a coworker to take the 1300+mile round trip with me; it took less than a minute:
“Hey Scott, road trip tomorrow to pick up a bike. You in?”
“Yeah man, I’m in.”
One hour later…
“Where are we going?”
“Georgia.”
“Cool.”
(Ah, the joys of being single adults.)
So, we made the trip Saturday afternoon, got to the hotel after dark, grabbed some southern fried chicken, a couple drinks and called it a day. At sun-up on Sunday, we picked up the U-haul trailer, and met an absolute peach of woman in a Walmart parking lot. She was a bit in disbelief that we actually showed up. Everyone close to her told her it was a scam, that no one from Pittsburgh, PA was gonna drive down to pick up a bike that was widely available. Low and behold, there we were, cash in hand, trailer on the truck and just a tinge of a hangover from the night before. We loaded up the bike and headed north to finish the trip in 30 hours. (Friends and family never realized we’d even left town.)
 (The first ride, the day after I got the bike to Pittsburgh.)
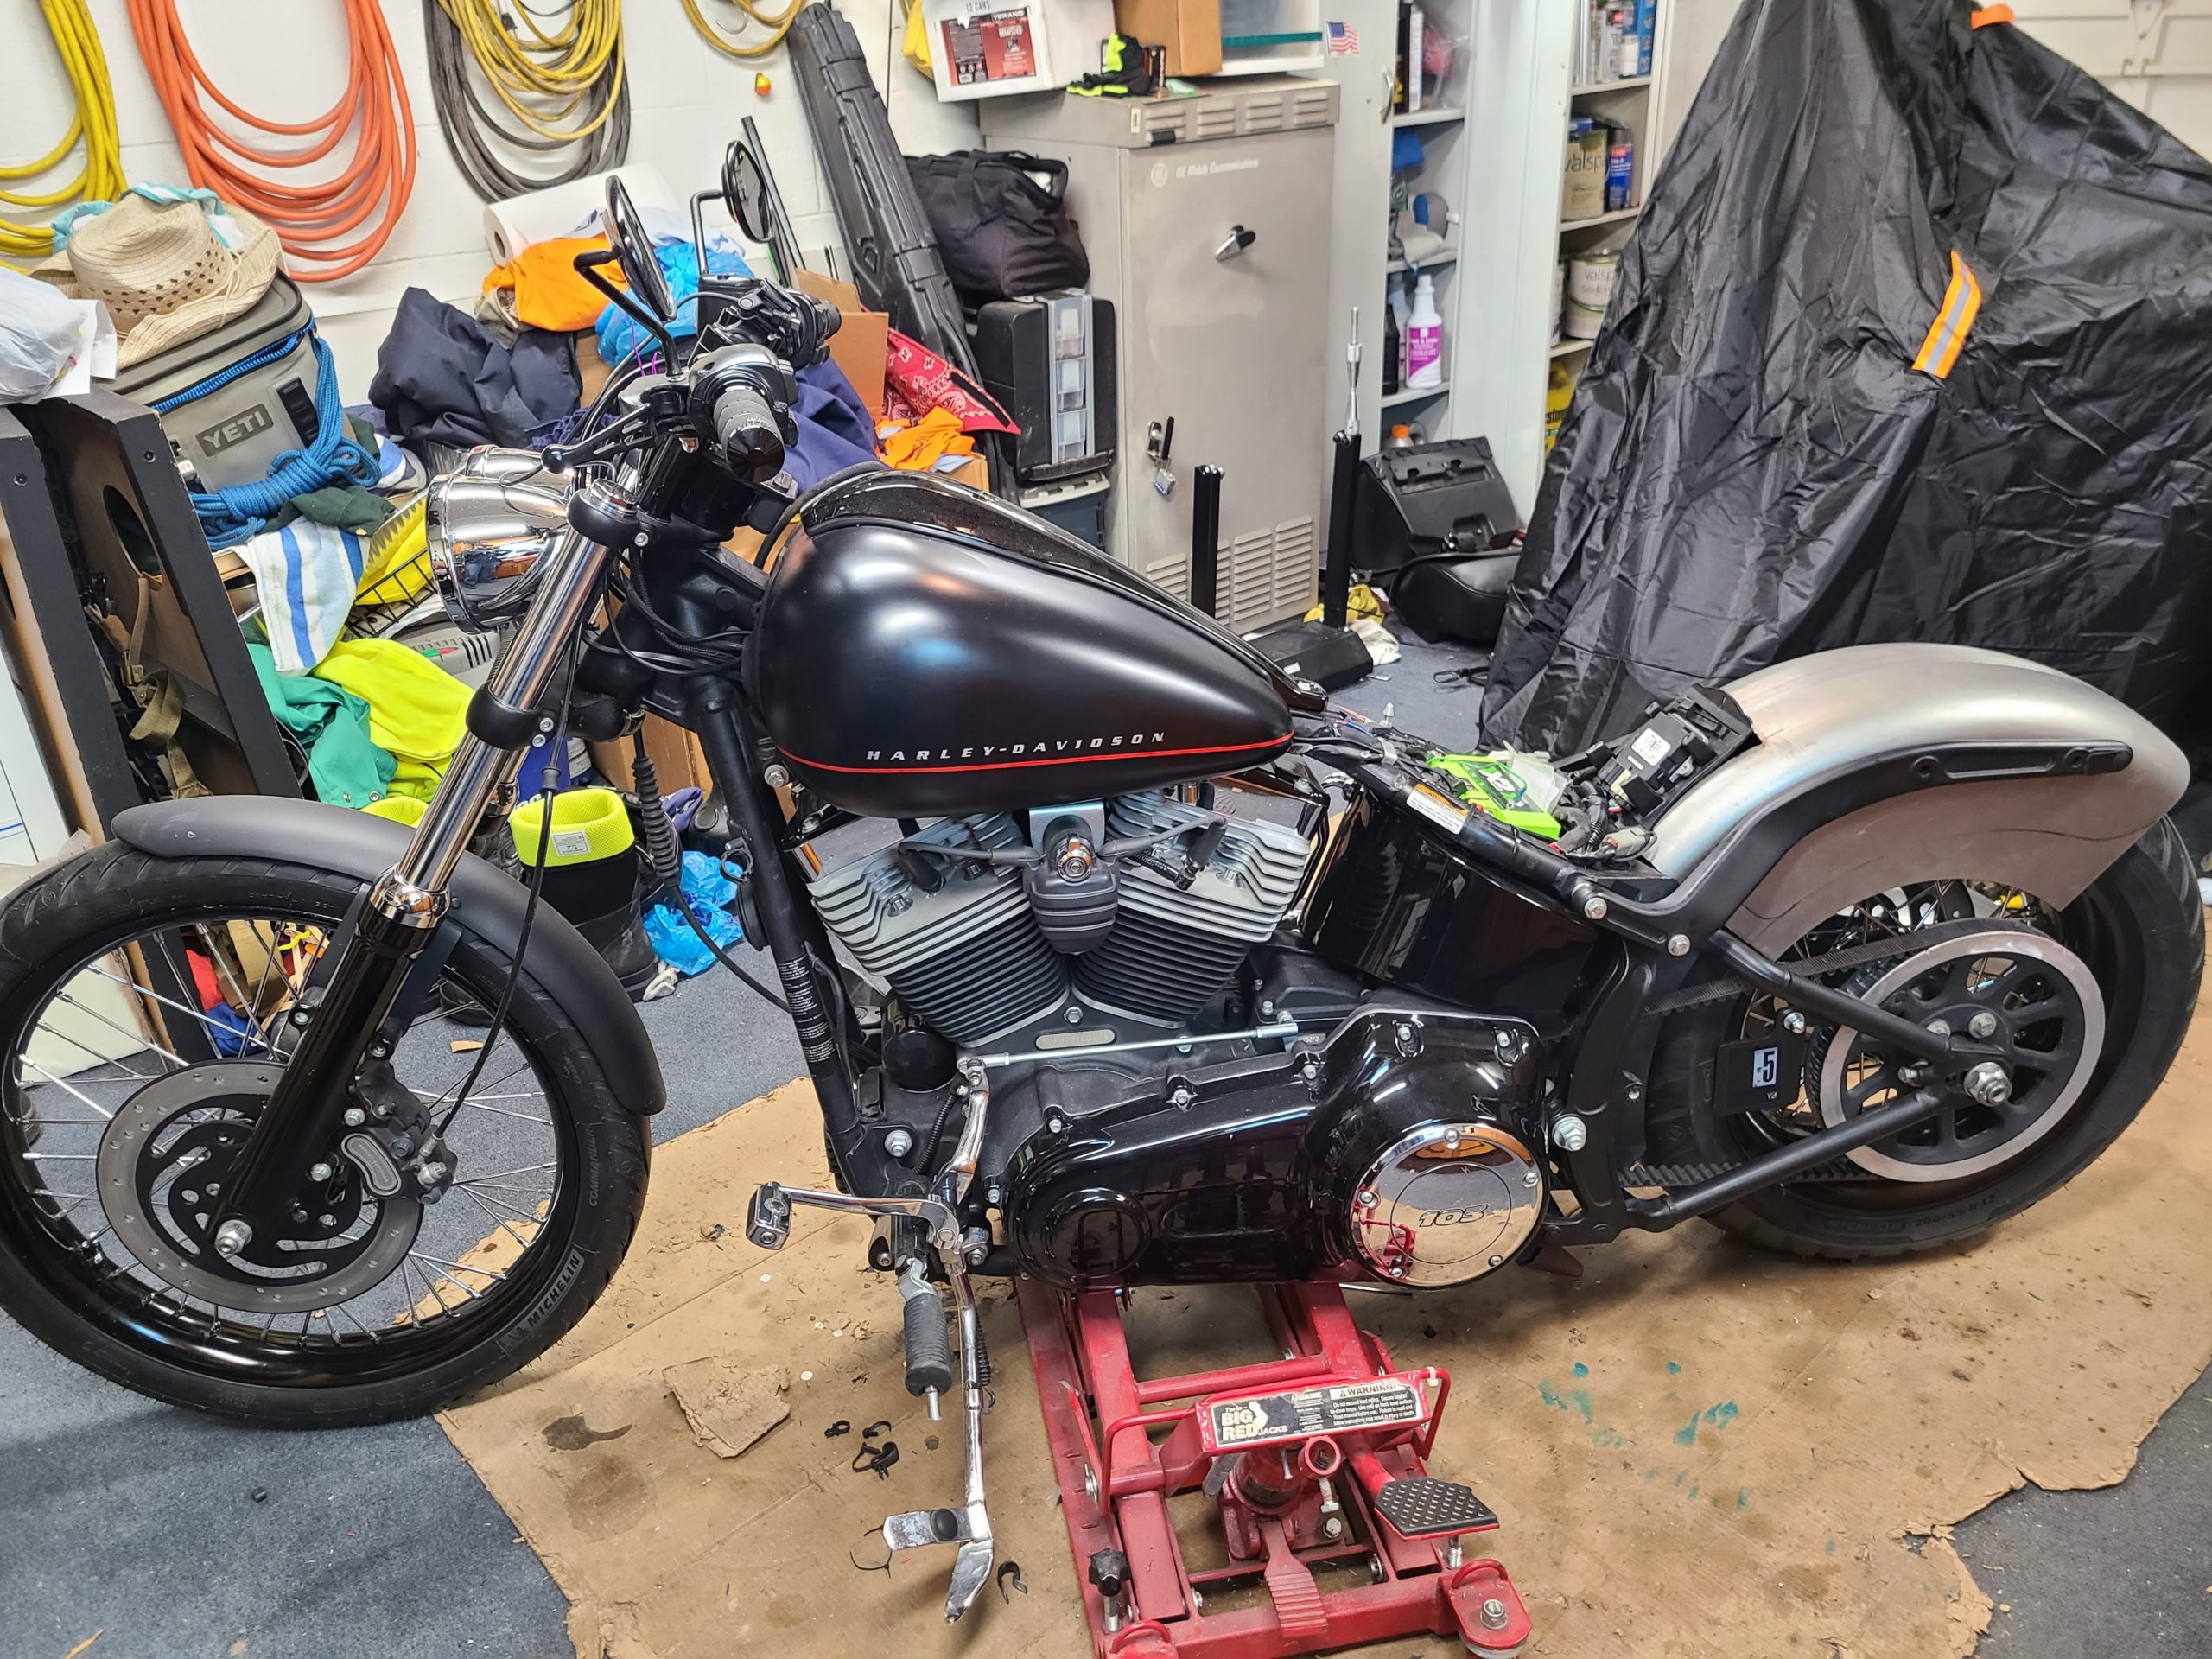
I rode the Blackline as it was for the rest of the 2021 season, evaluating it, getting to know it. What I liked, loved and hated. Never one to leave well enough alone, I knew I was going to change things to make it “mine”. Right away I wasn’t a fan of the skinny back tire, and my back side wasn’t a fan of the stock seat, even for shorter rides.
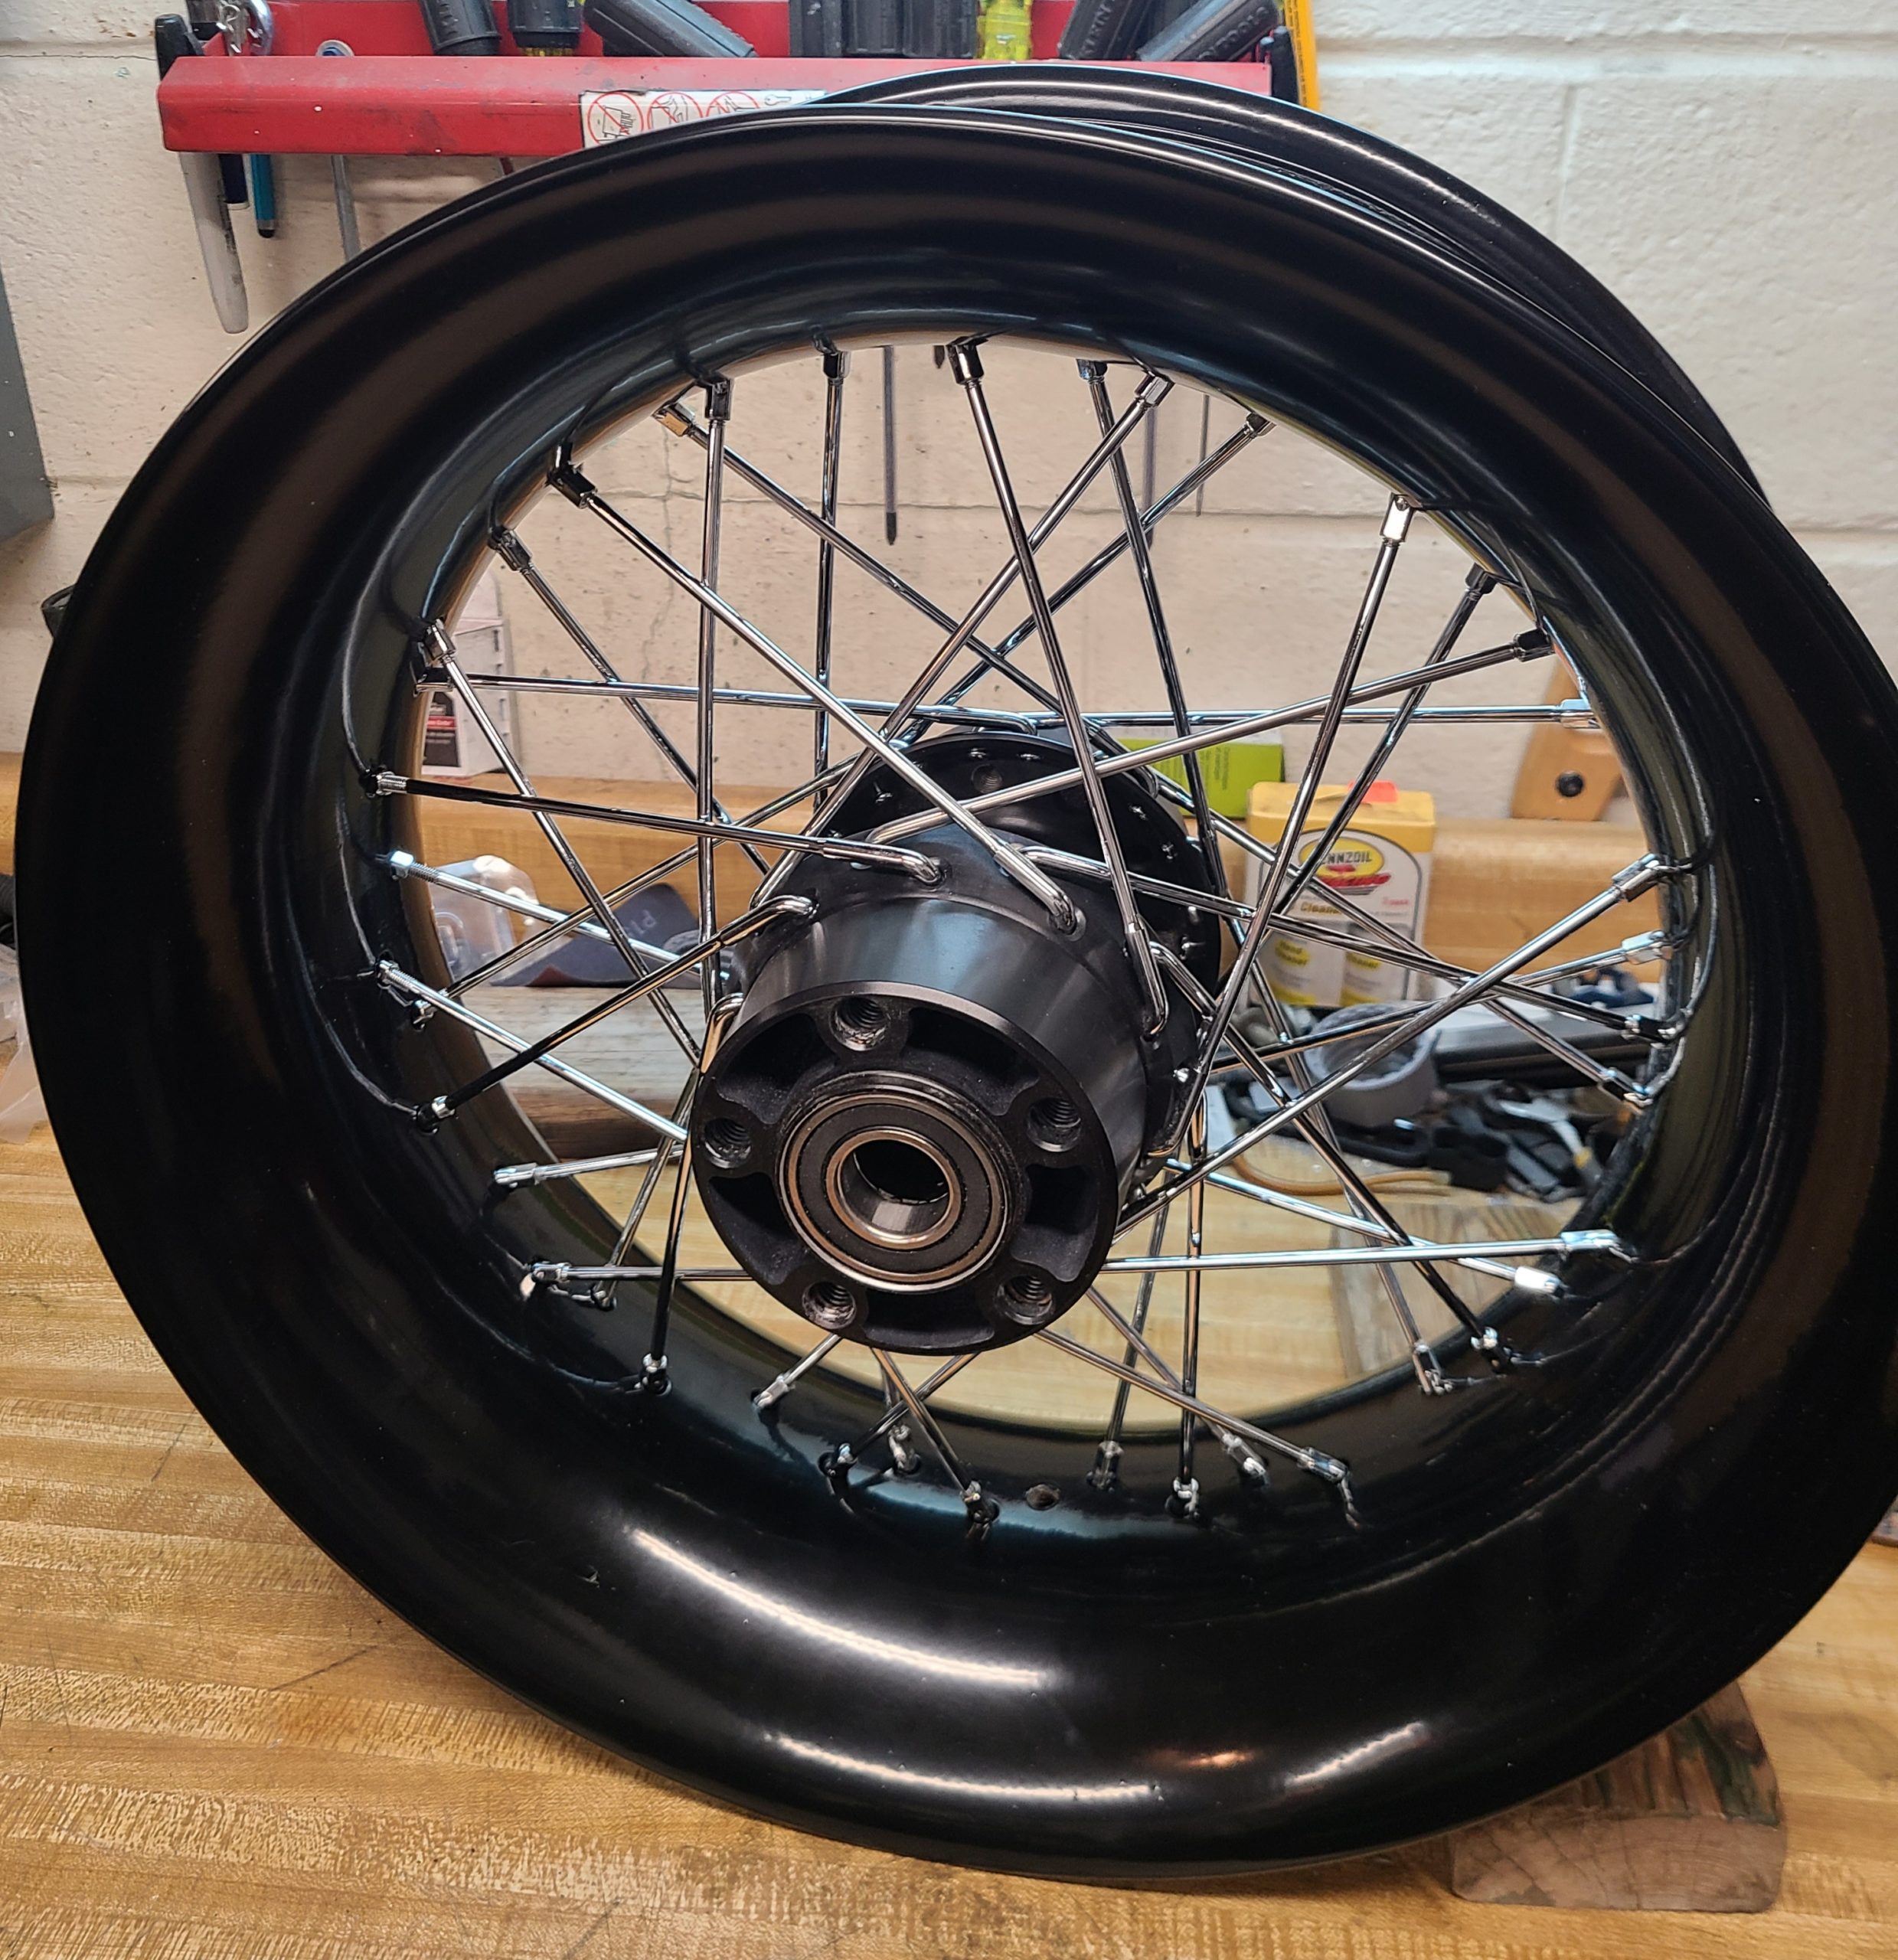
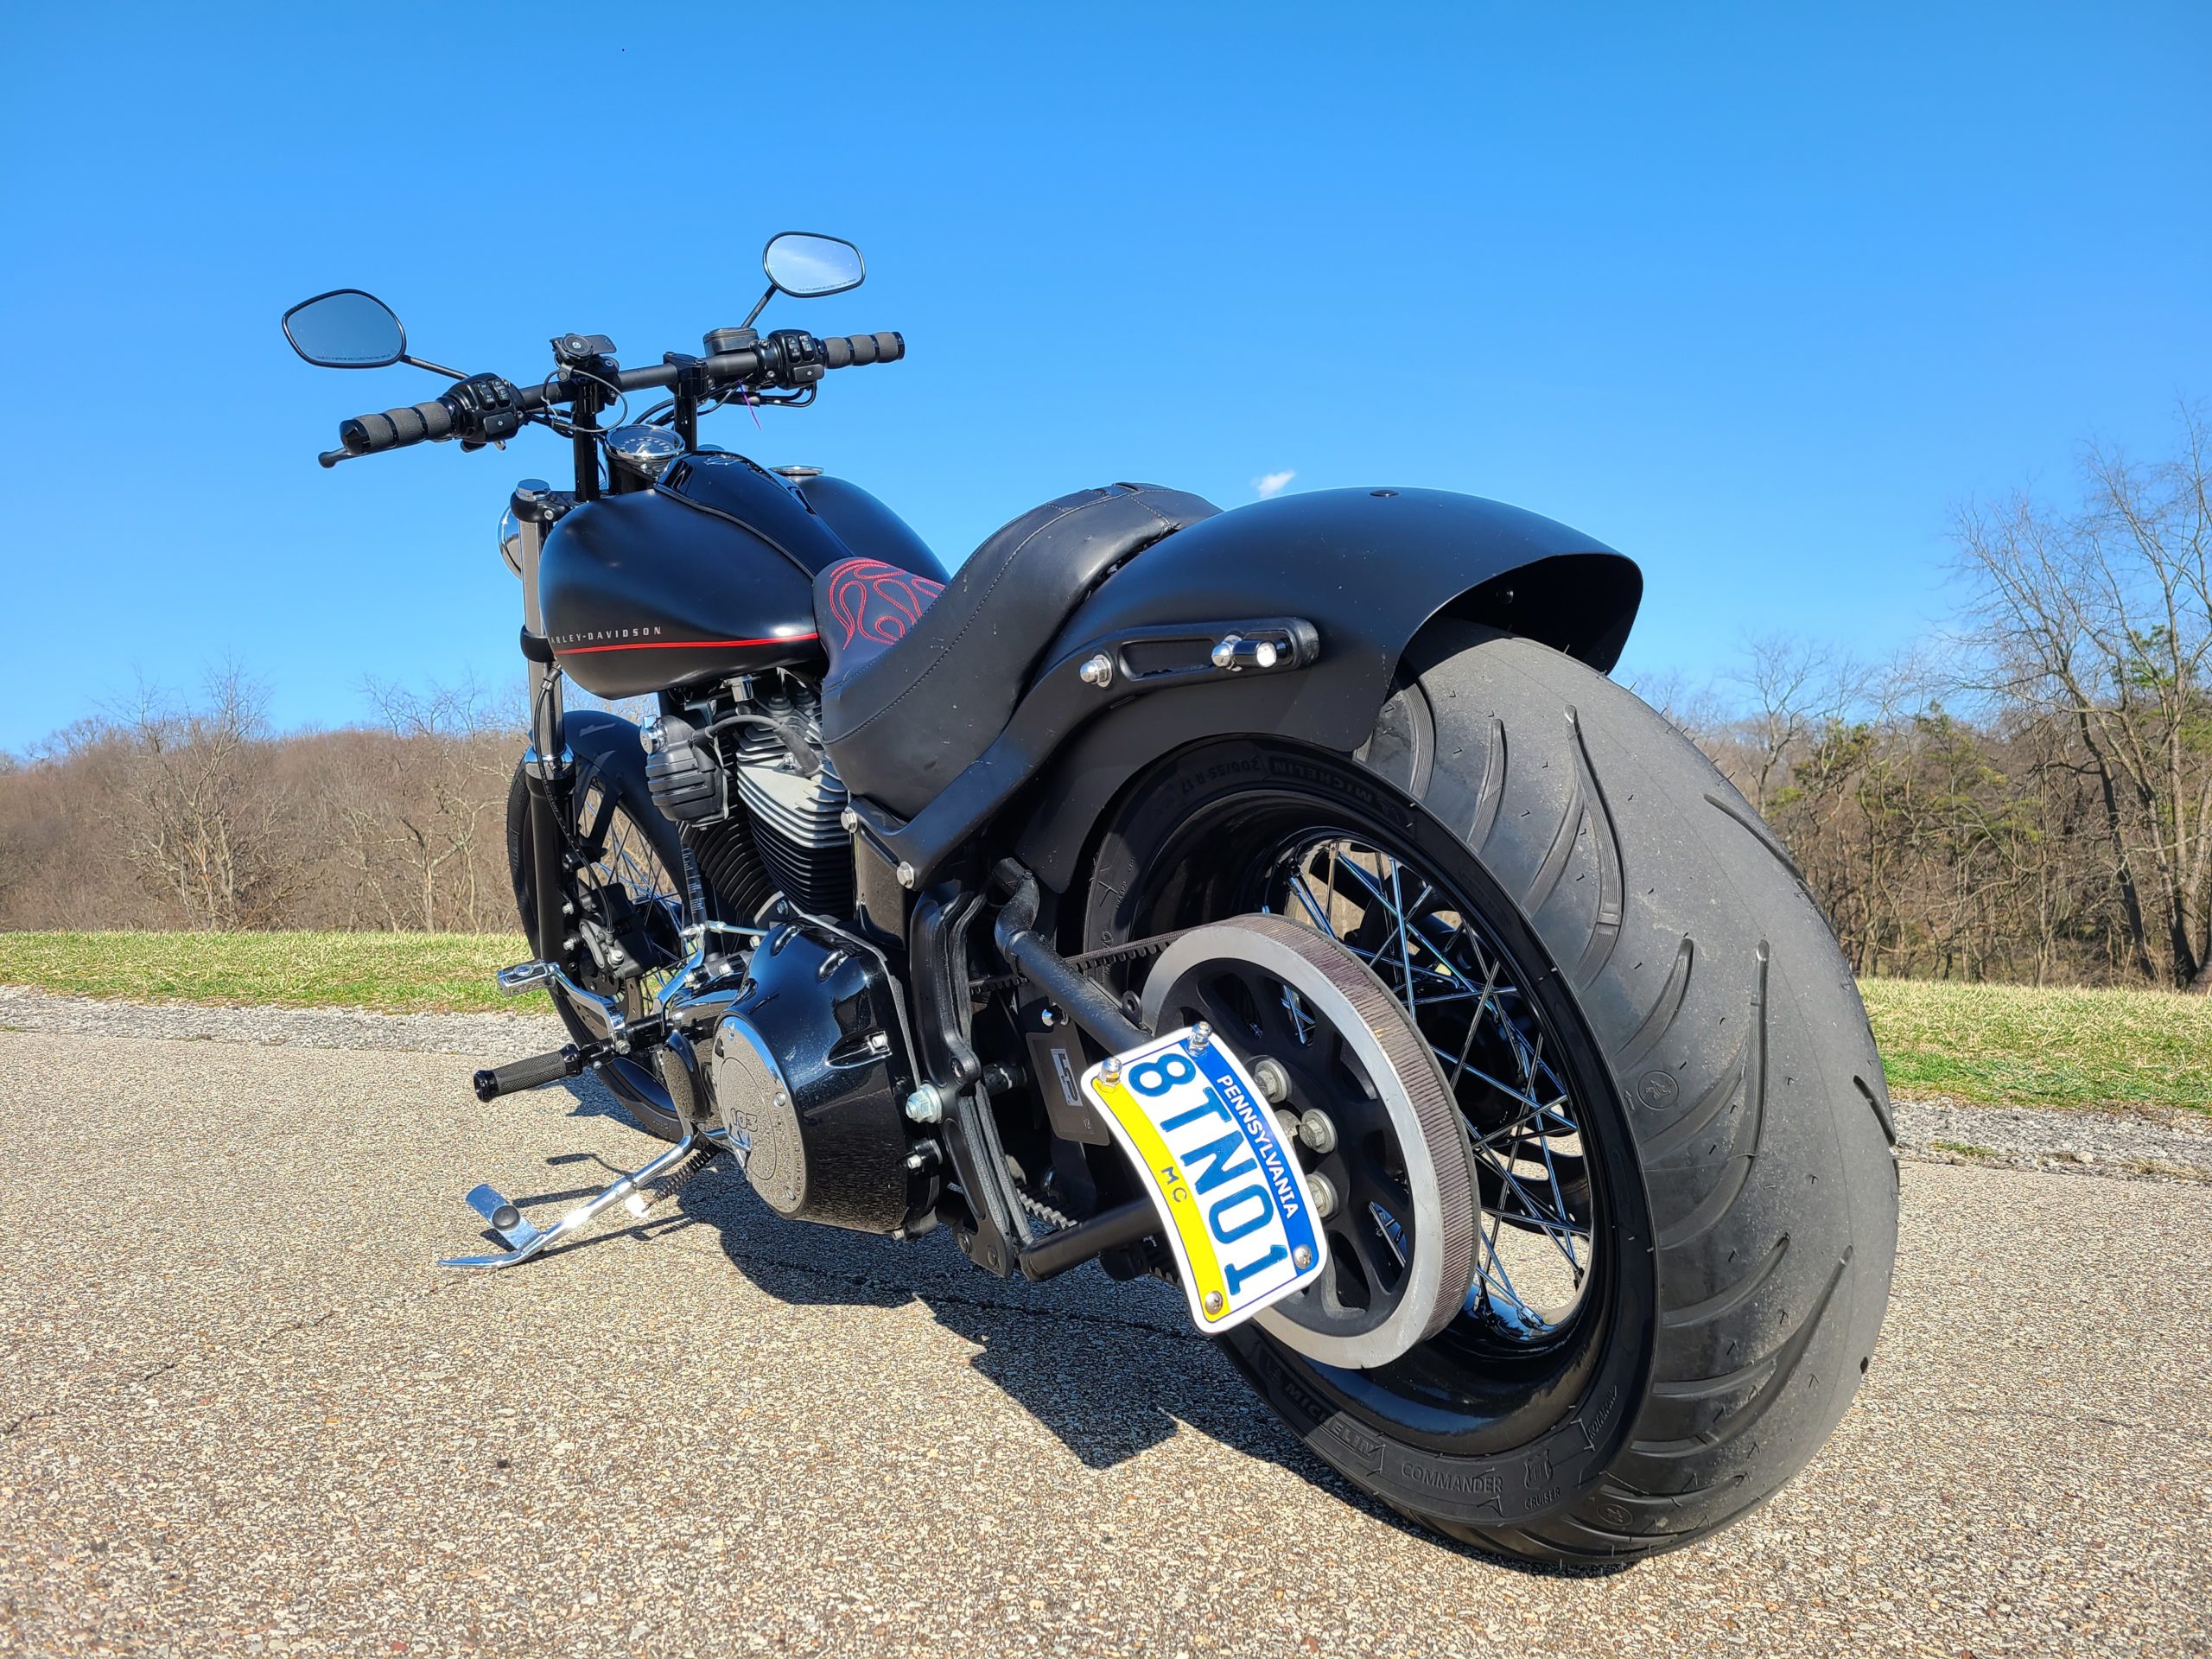
Feeling confident about the initial direction of this home build, I placed the order for a Corbin Classic Solo, black on black with red stitching. Clean, subtle and simple. While waiting for the seat, and with riding season coming to a close, it was time to roll into the garage and swap out that skinny rear wheel and tire. Not one for flashy aftermarket wheels or fat spokes, I decided to stay with the “Profiler” wheels the MoCo used on the bike.
But after I pulled the rear end apart, I couldn’t find a stock style rear wheel in a 17×6 to hold a 200 wide tire. So I snagged a badly corroded 17×6 once-chrome unit from a Softail Custom on ebay. Right shape, profile and size but it would take some effort to make it match the front – and the vision in my head. So I had a local shop strip the chrome, then finished cleaning it up at home. Using a borrowed home powdercoat kit, I coated it and baked it in my propane smoker (I do NOT recommend this. It took a LONG time to get the smell out of the smoker so I could cook BBQ again…) Next, I cut the spokes out of the original wheel and re-laced the original hub to the new wheel, truing it on my work bench with a budget truing stand. This took almost as many tries as it did sips of whiskey, over several nights. It was tedious but relaxing at the same time, with no deadline I was in no hurry. When I got frustrated, I’d walk away and try again on another night till I got it done.
To cover the new tire and wheel, I got an 8.5” fender blank and started cutting with an angle grinder. Got a shape I liked then realized I needed to space the rear fender struts away from the frame ¾” on each side. Heading into work the next day, I mentioned to a coworker what I was stuck on, as I didn’t want to use washers as spacers. I wanted something cleaner, more subtle. We went and talked to another coworker, an “at home machinist” who’s known to have a lathe and other equipment not found in my meagre garage. Being resourceful blue collar guys, we managed to get our hands on a chunk of a steel road plate of adequate thickness then rough cut it at work to an easy to carry size.
After some sketches, measurements, and lots of text messaging while test fitting, I ended up with spacers that indexed to the factory frame mounts and spaced the struts precisely as needed. A quick shot of color and they’re hardly noticeable.
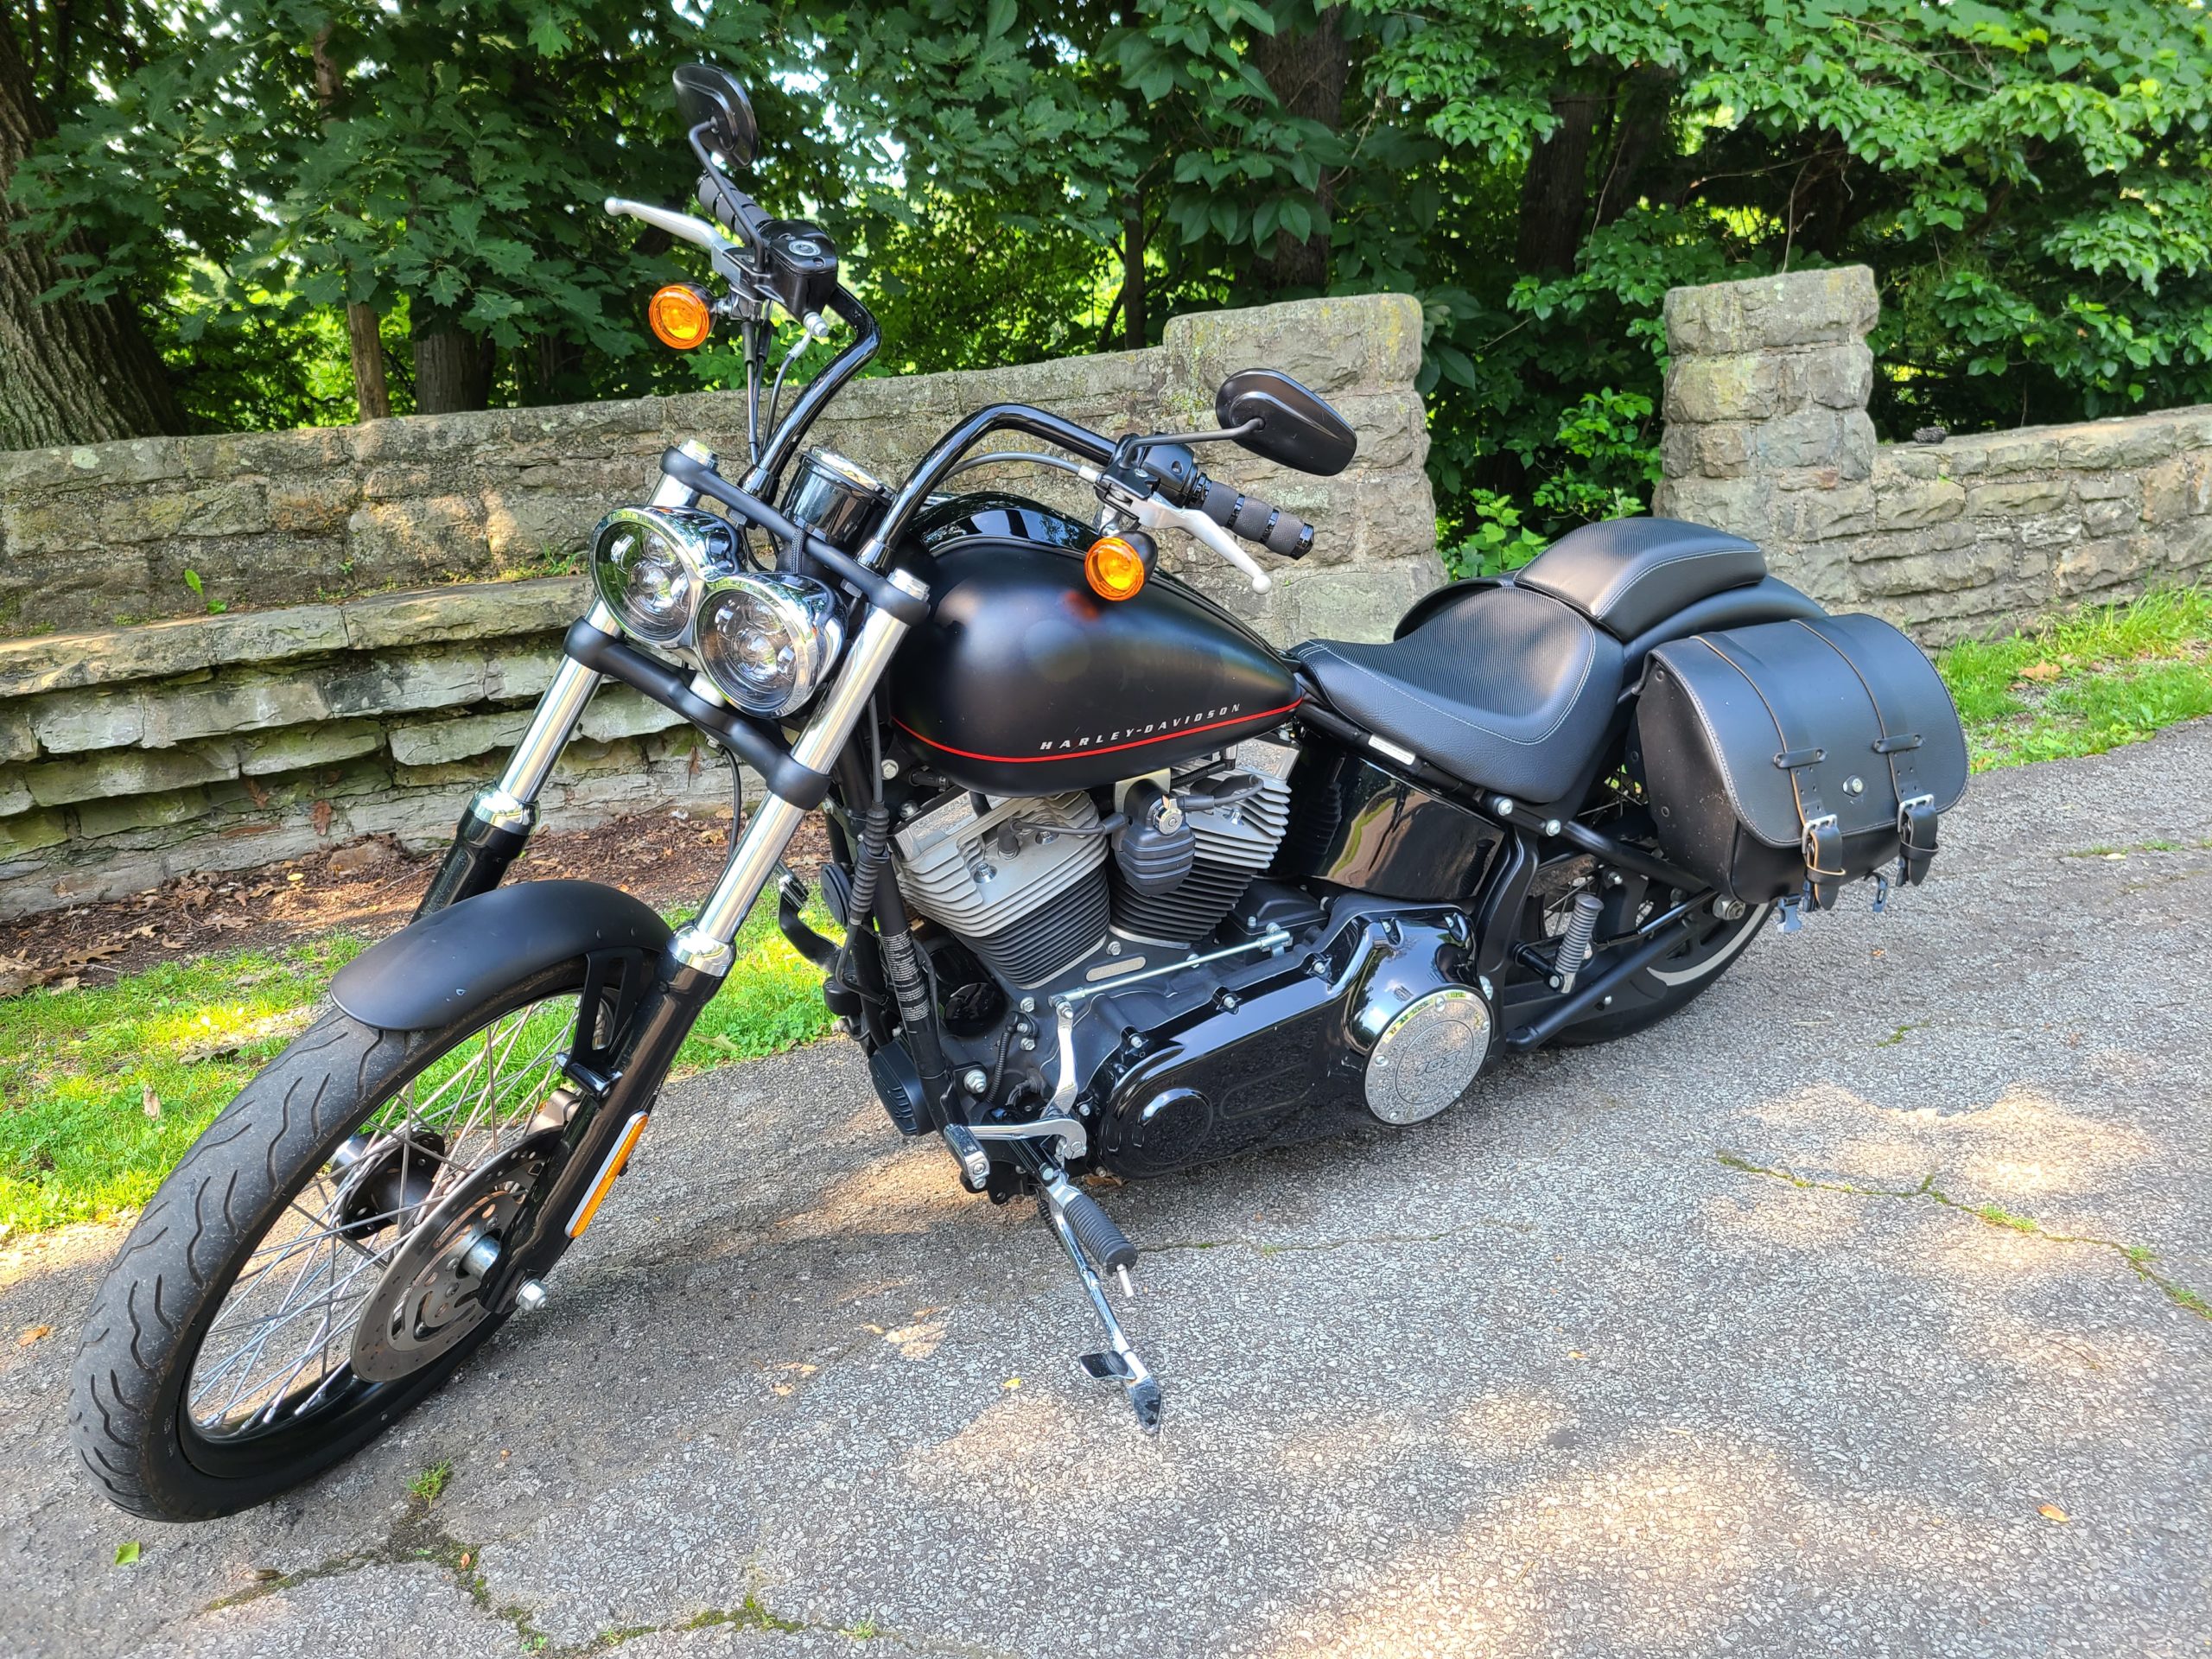
With the fender sorted out and since the snow was still blowing, I figured why not change the attitude of the bike with a more aggressive position fitting my 6-foot+ frame with a set of drags bars? The swap happened without much fuss. I also changed out the front lights to some LED’s that offered a sleek look, hidden under the controls, mounted by the mirror nuts.
(With the fender taking shape, I started leasing garage space to fund this little project)
I’ll stop here for now – gotta go work off those favors I asked from the friends who helped me get this far. Next time, the custom Corbin seat arrives and I swap out the pegs, all the while thinking about completing the Stage 1 performance upgrade inspired by the Vance & Hines pipes that came on the bike.
Editor’s Note: This is the second installment in the Iron Trader News Blue Collar Blackline Project. It’s a real-world, budget-minded build with the vision and elbow grease provided by a regular rider. Dave consults friends and experts when it’s appropriate but mostly he figures it out, showing that you can, too.
PART 2
 I had worked off the favors I’d asked for and the snow was still piled up outside when a box from Corbin arrived at my front door. My first impression of the new seat when I unboxed it, slipped it out of the bag, and the intoxicating scent of freshly worked leather hit my face was, “This is too nice to sit on.” I admired it, the obvious care and skill that went into its creation, the attention to detail in the stitching, the hand worked seams and rivets to make the cover fit perfectly over the hand cut padding. I went down to the garage, turned on the heaters and (Gasp!) read the directions. I didn’t want to risk screwing this up and damaging the fresh leather. The installation was straight forward, and the fit was perfect. The Blackline is a bit obscure as far as Softails go. It was only made for a few short years, so I was surprised to see Corbin had a seat for it, and amazed at how well it fit.
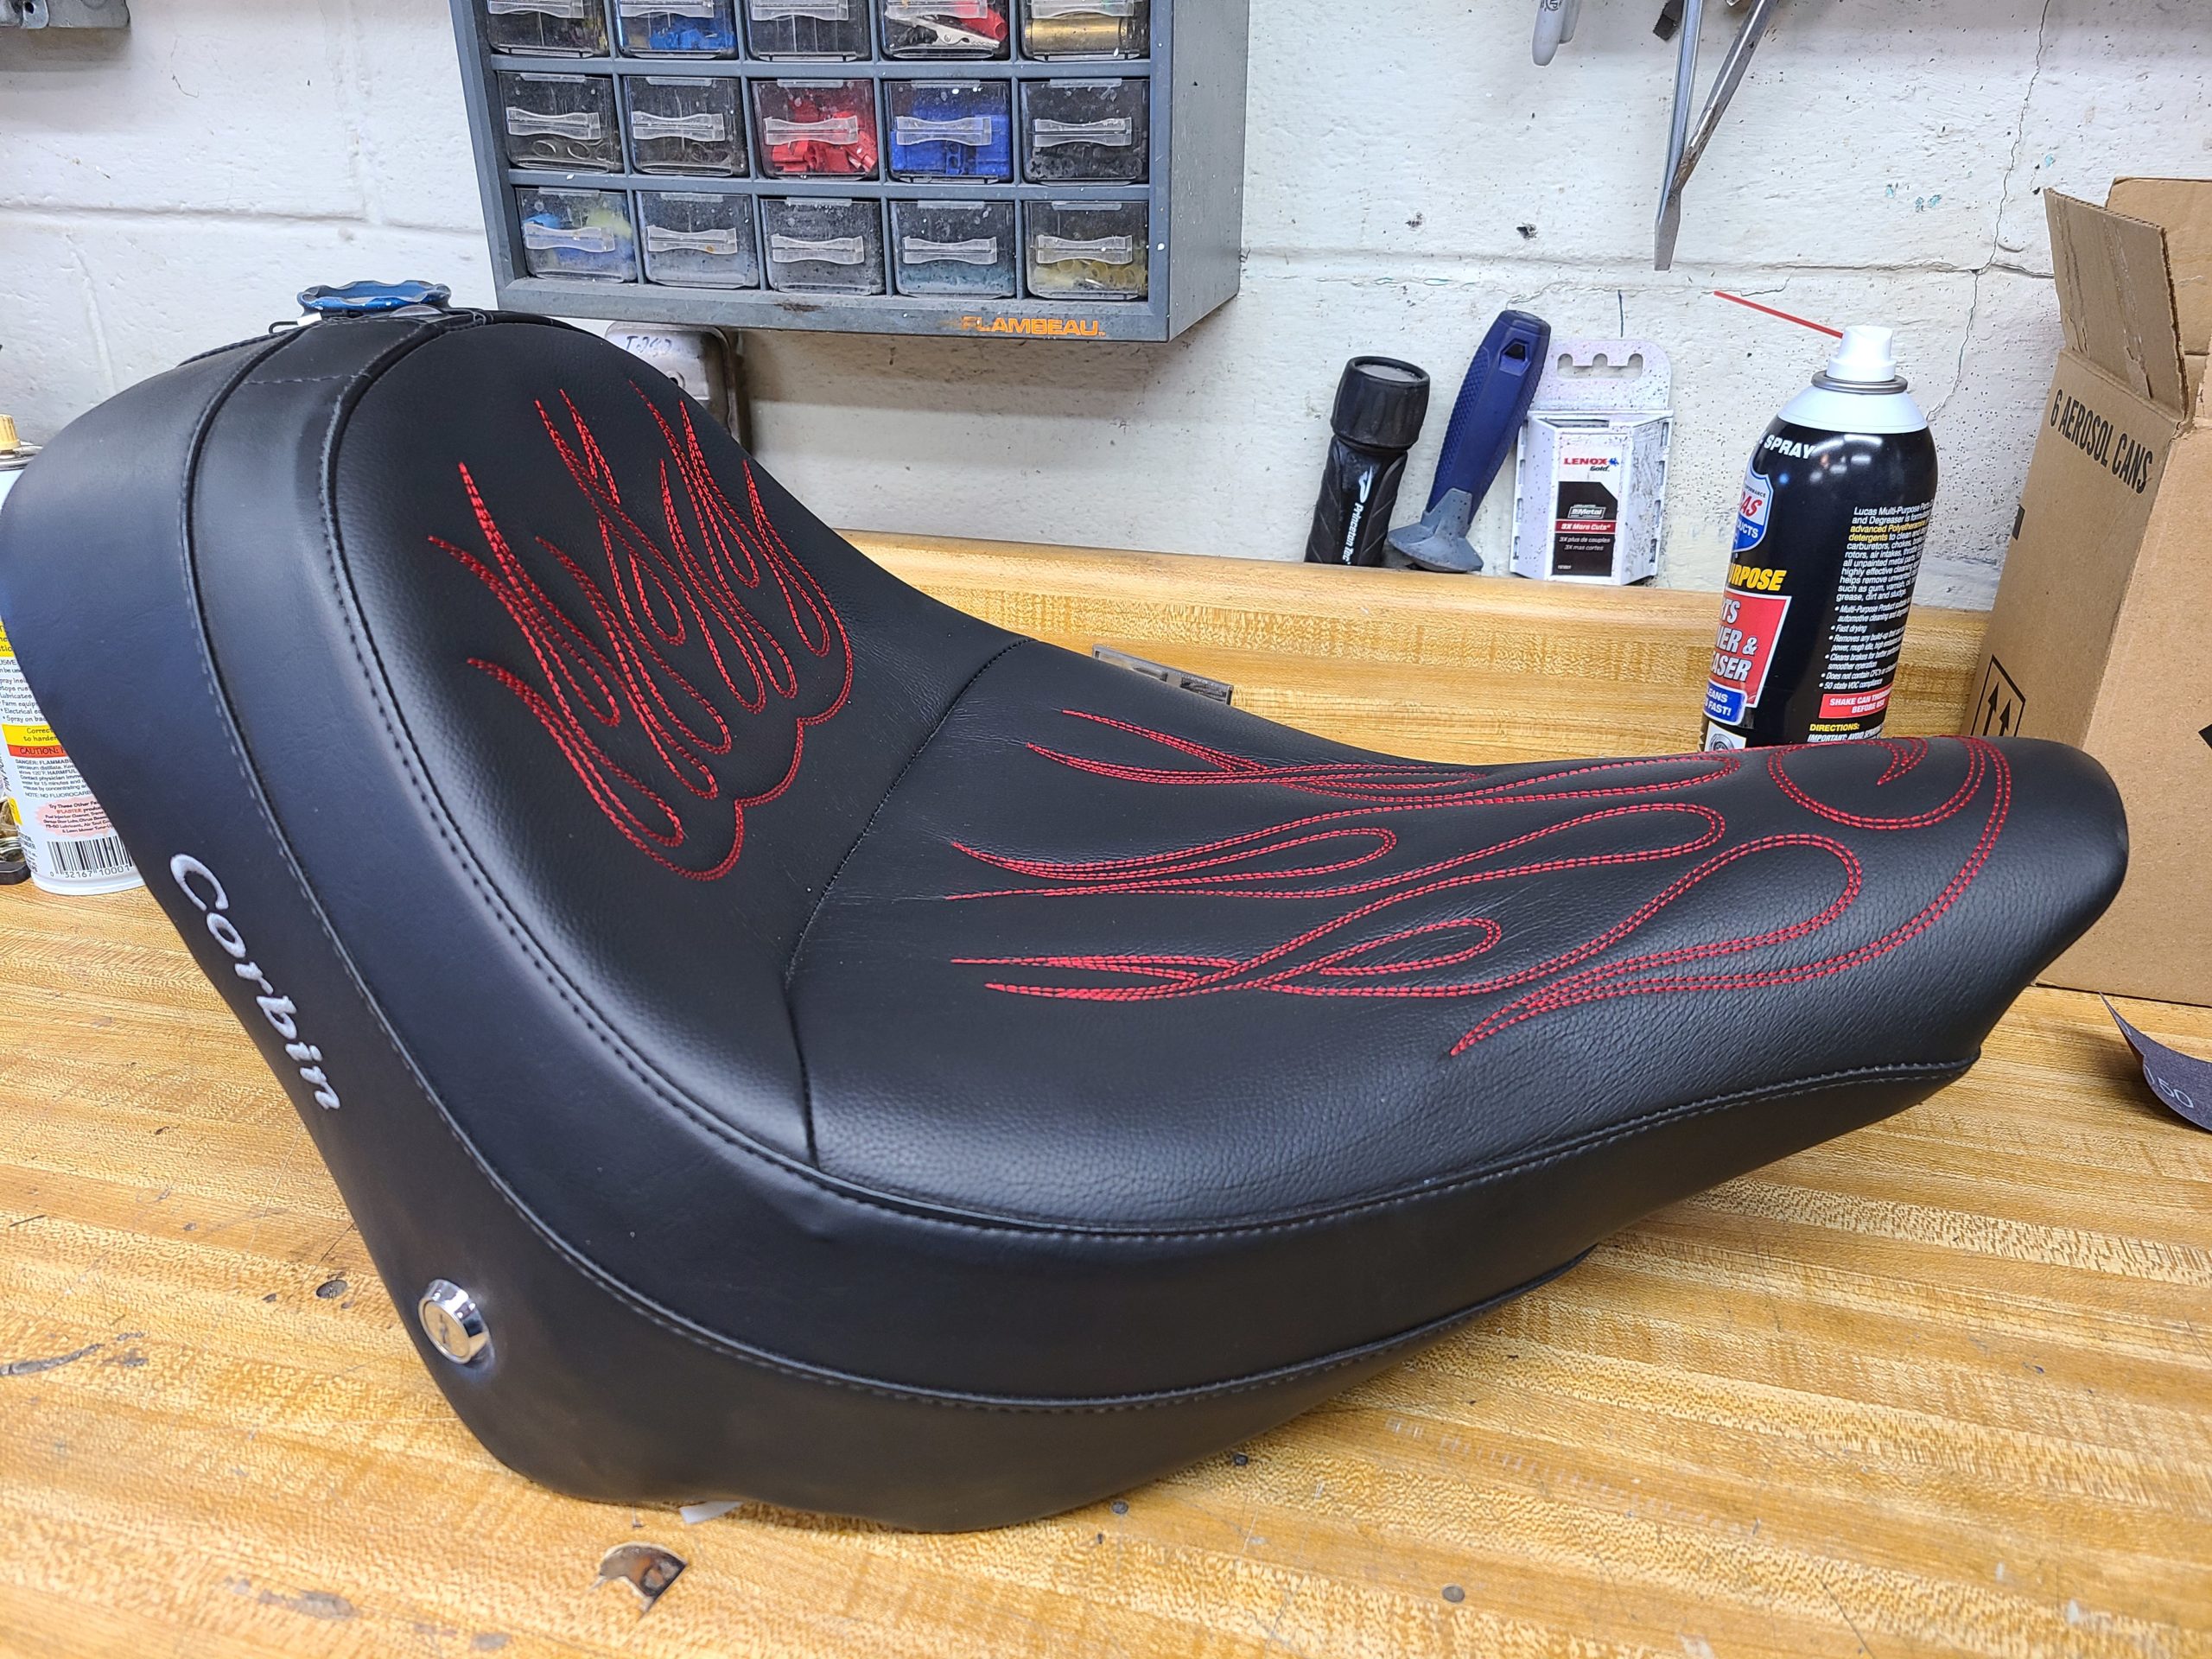
In Pittsburgh, Mother Nature’s springtime attitude can be as unpredictable as some of my ex’s. So while 70 degrees in March isn’t expected, it’s not surprising either and when it happened, I did the only thing you can do: I called in a sick day, fueled up the bike and backed it out of the garage… then went to get a new battery because, of course it was dead. That sorted, I fired it up and went for a ride on the new Corbin seat. Coming out of the driveway, my first thought was that it was a firm seat… About a mile down the road I forgot about the firmness. A few miles later, I realized just how comfortable it was. As the tires warmed up, I began riding a bit more spiritedly. I immediately appreciated how the seat held on to me as I dipped the bike into the bends, probably faster and harder than I needed to. Dodging the potholes and piles of road salt in early March, the Corbin Solo kept me firmly planted on the bike, switching left to right, dragging the pegs (and my heels) around the sweeping two lanes, I never lost confidence. Compared to sitting “on” the old seat, with the Corbin Solo, it felt like I was sitting “in” the seat. The difference is that of the bench seat in dad’s old Nova and the bucket seats in a Camaro.
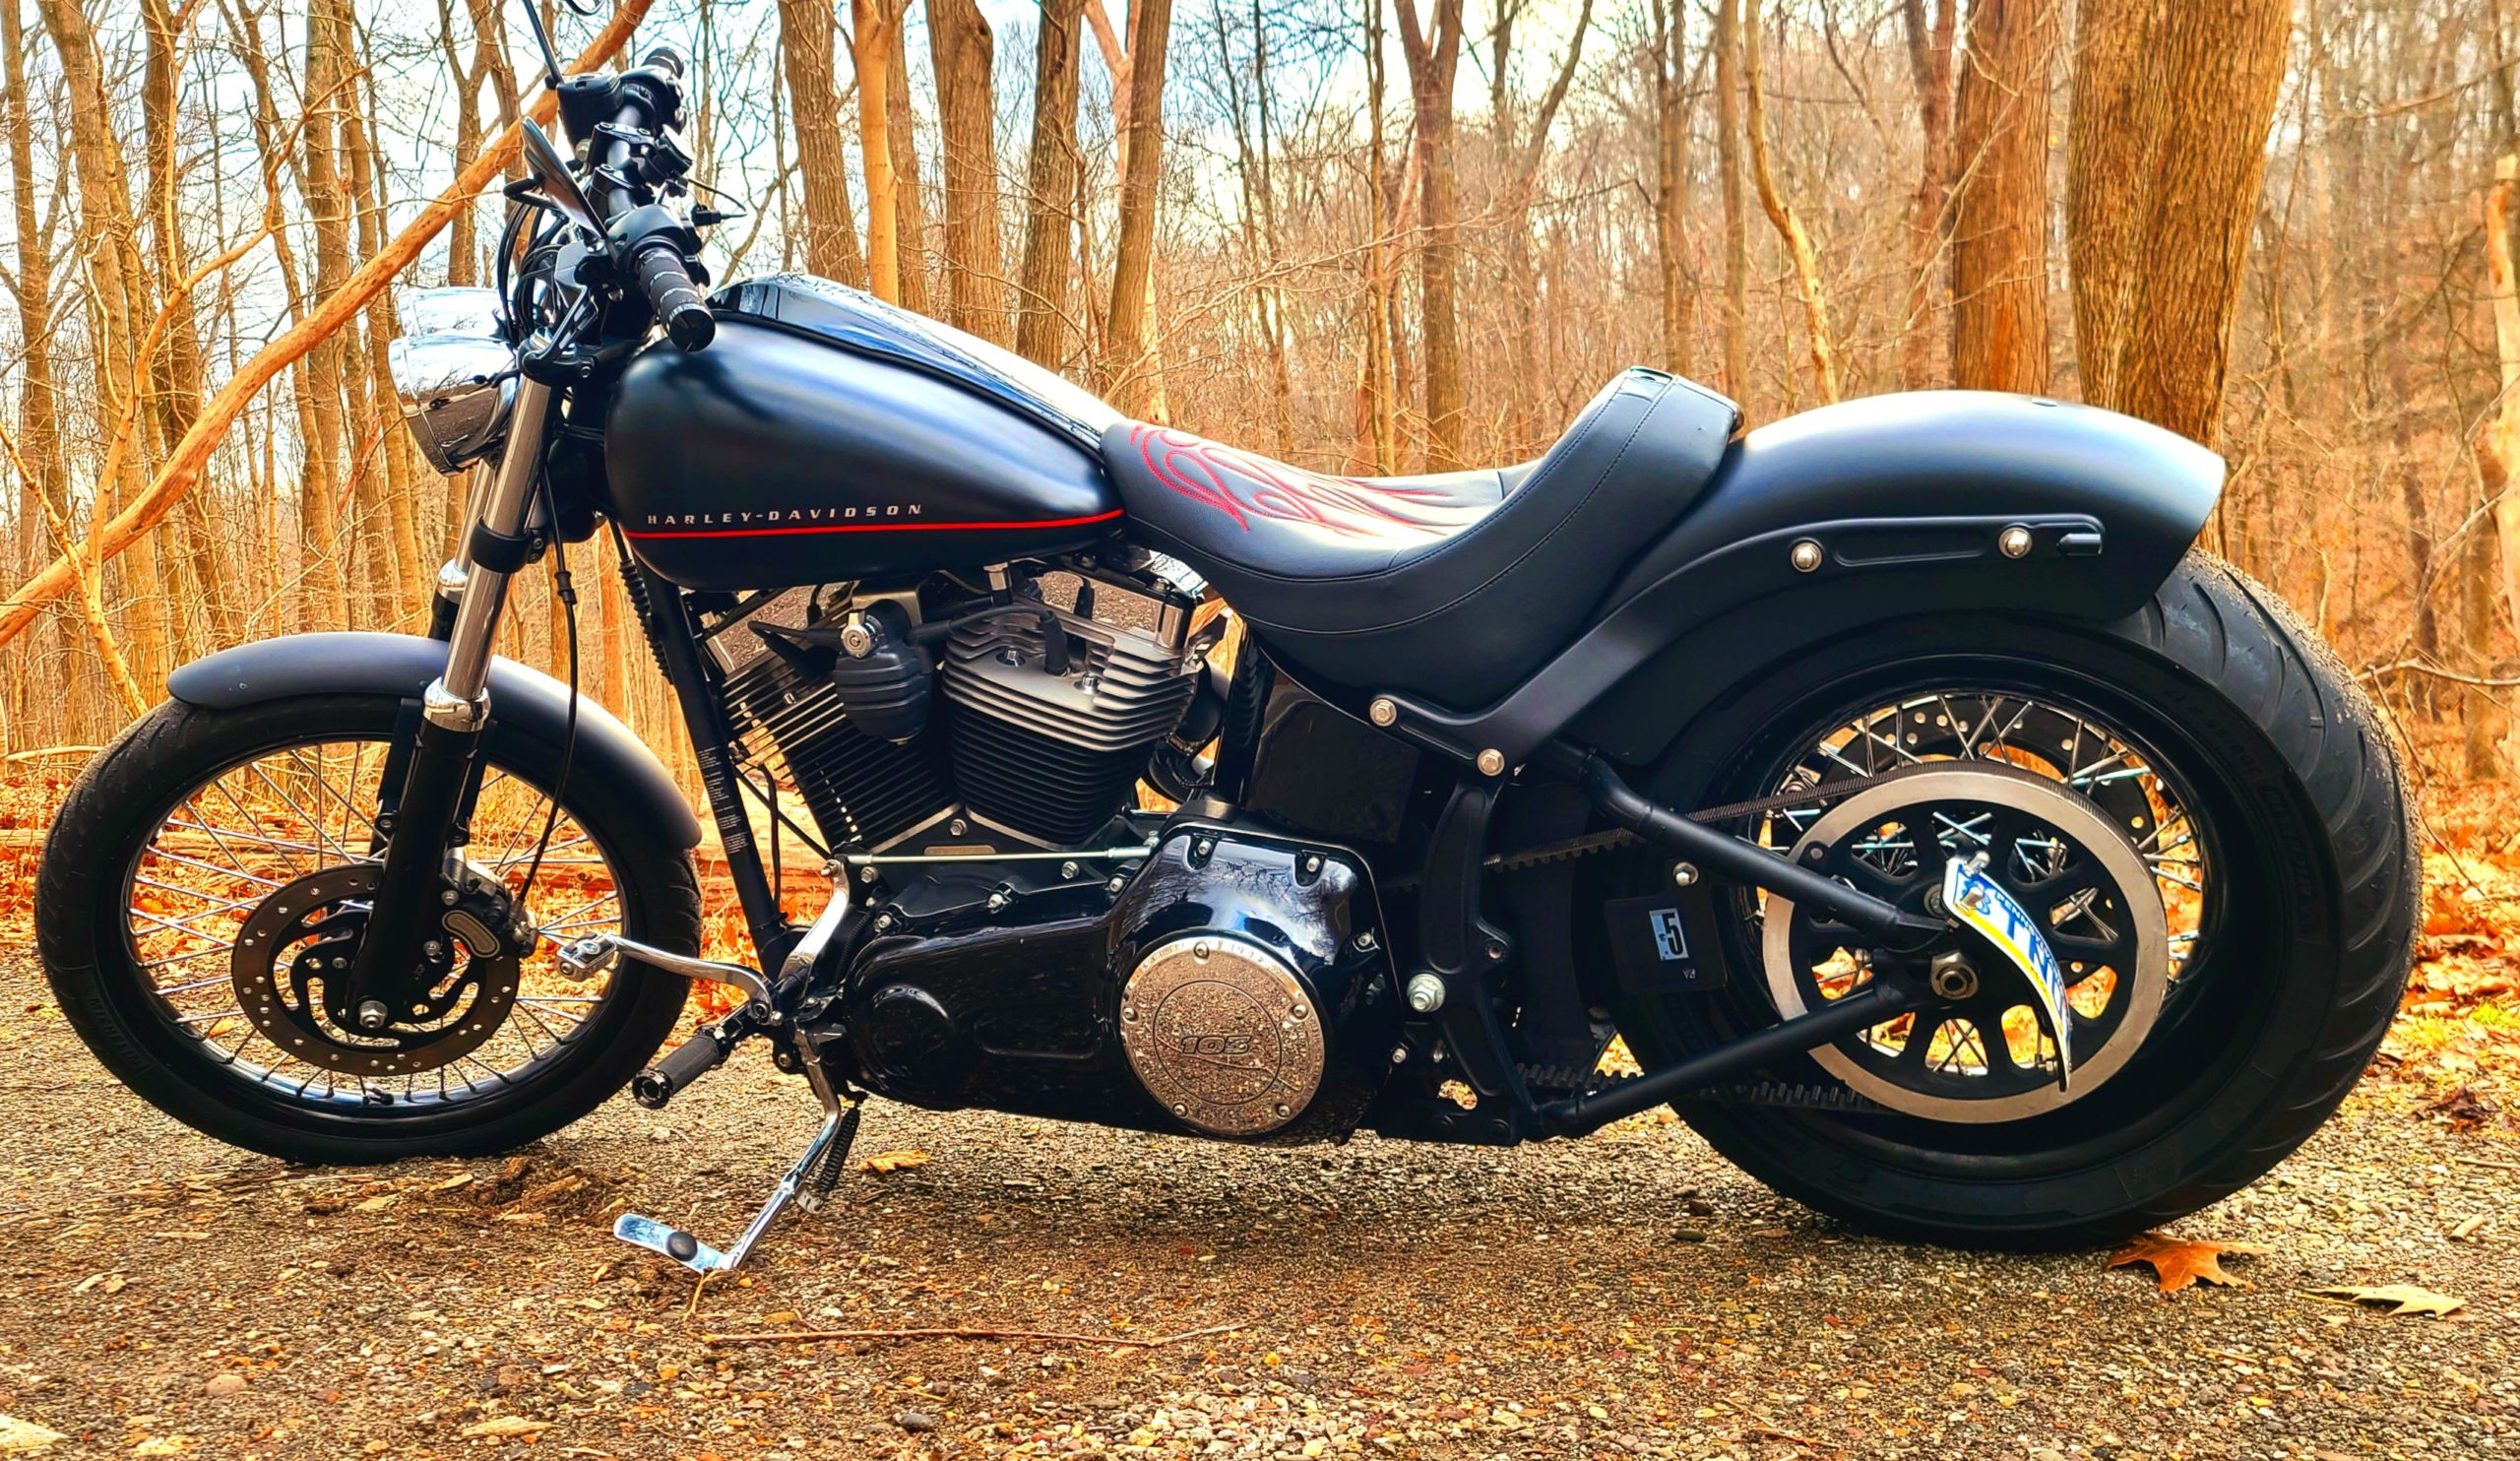
A snowstorm blanketed the area 2 days after that first ride. But I soon had another day to get out on the bike and test the seat. With temps in the high 60’s, sunshine and the taste of road salt in the air I fired up and went for a longer ride. I spent a few hours non-stop, through downtown Pittsburgh, then south into the rolling, dormant farms of southwestern PA. The Corbin Solo simply didn’t disappoint. It held on to me, firmly and comfortably. Gone were the days of a numb butt, the odd waddle we do as you get off the bike and can’t feel your ass. The planted feeling leaning into the turns is something I certainly enjoy. Though the look of the pegs and the scuffed heels on my boots after being drug on the salty pavement is something I’ll never enjoy…
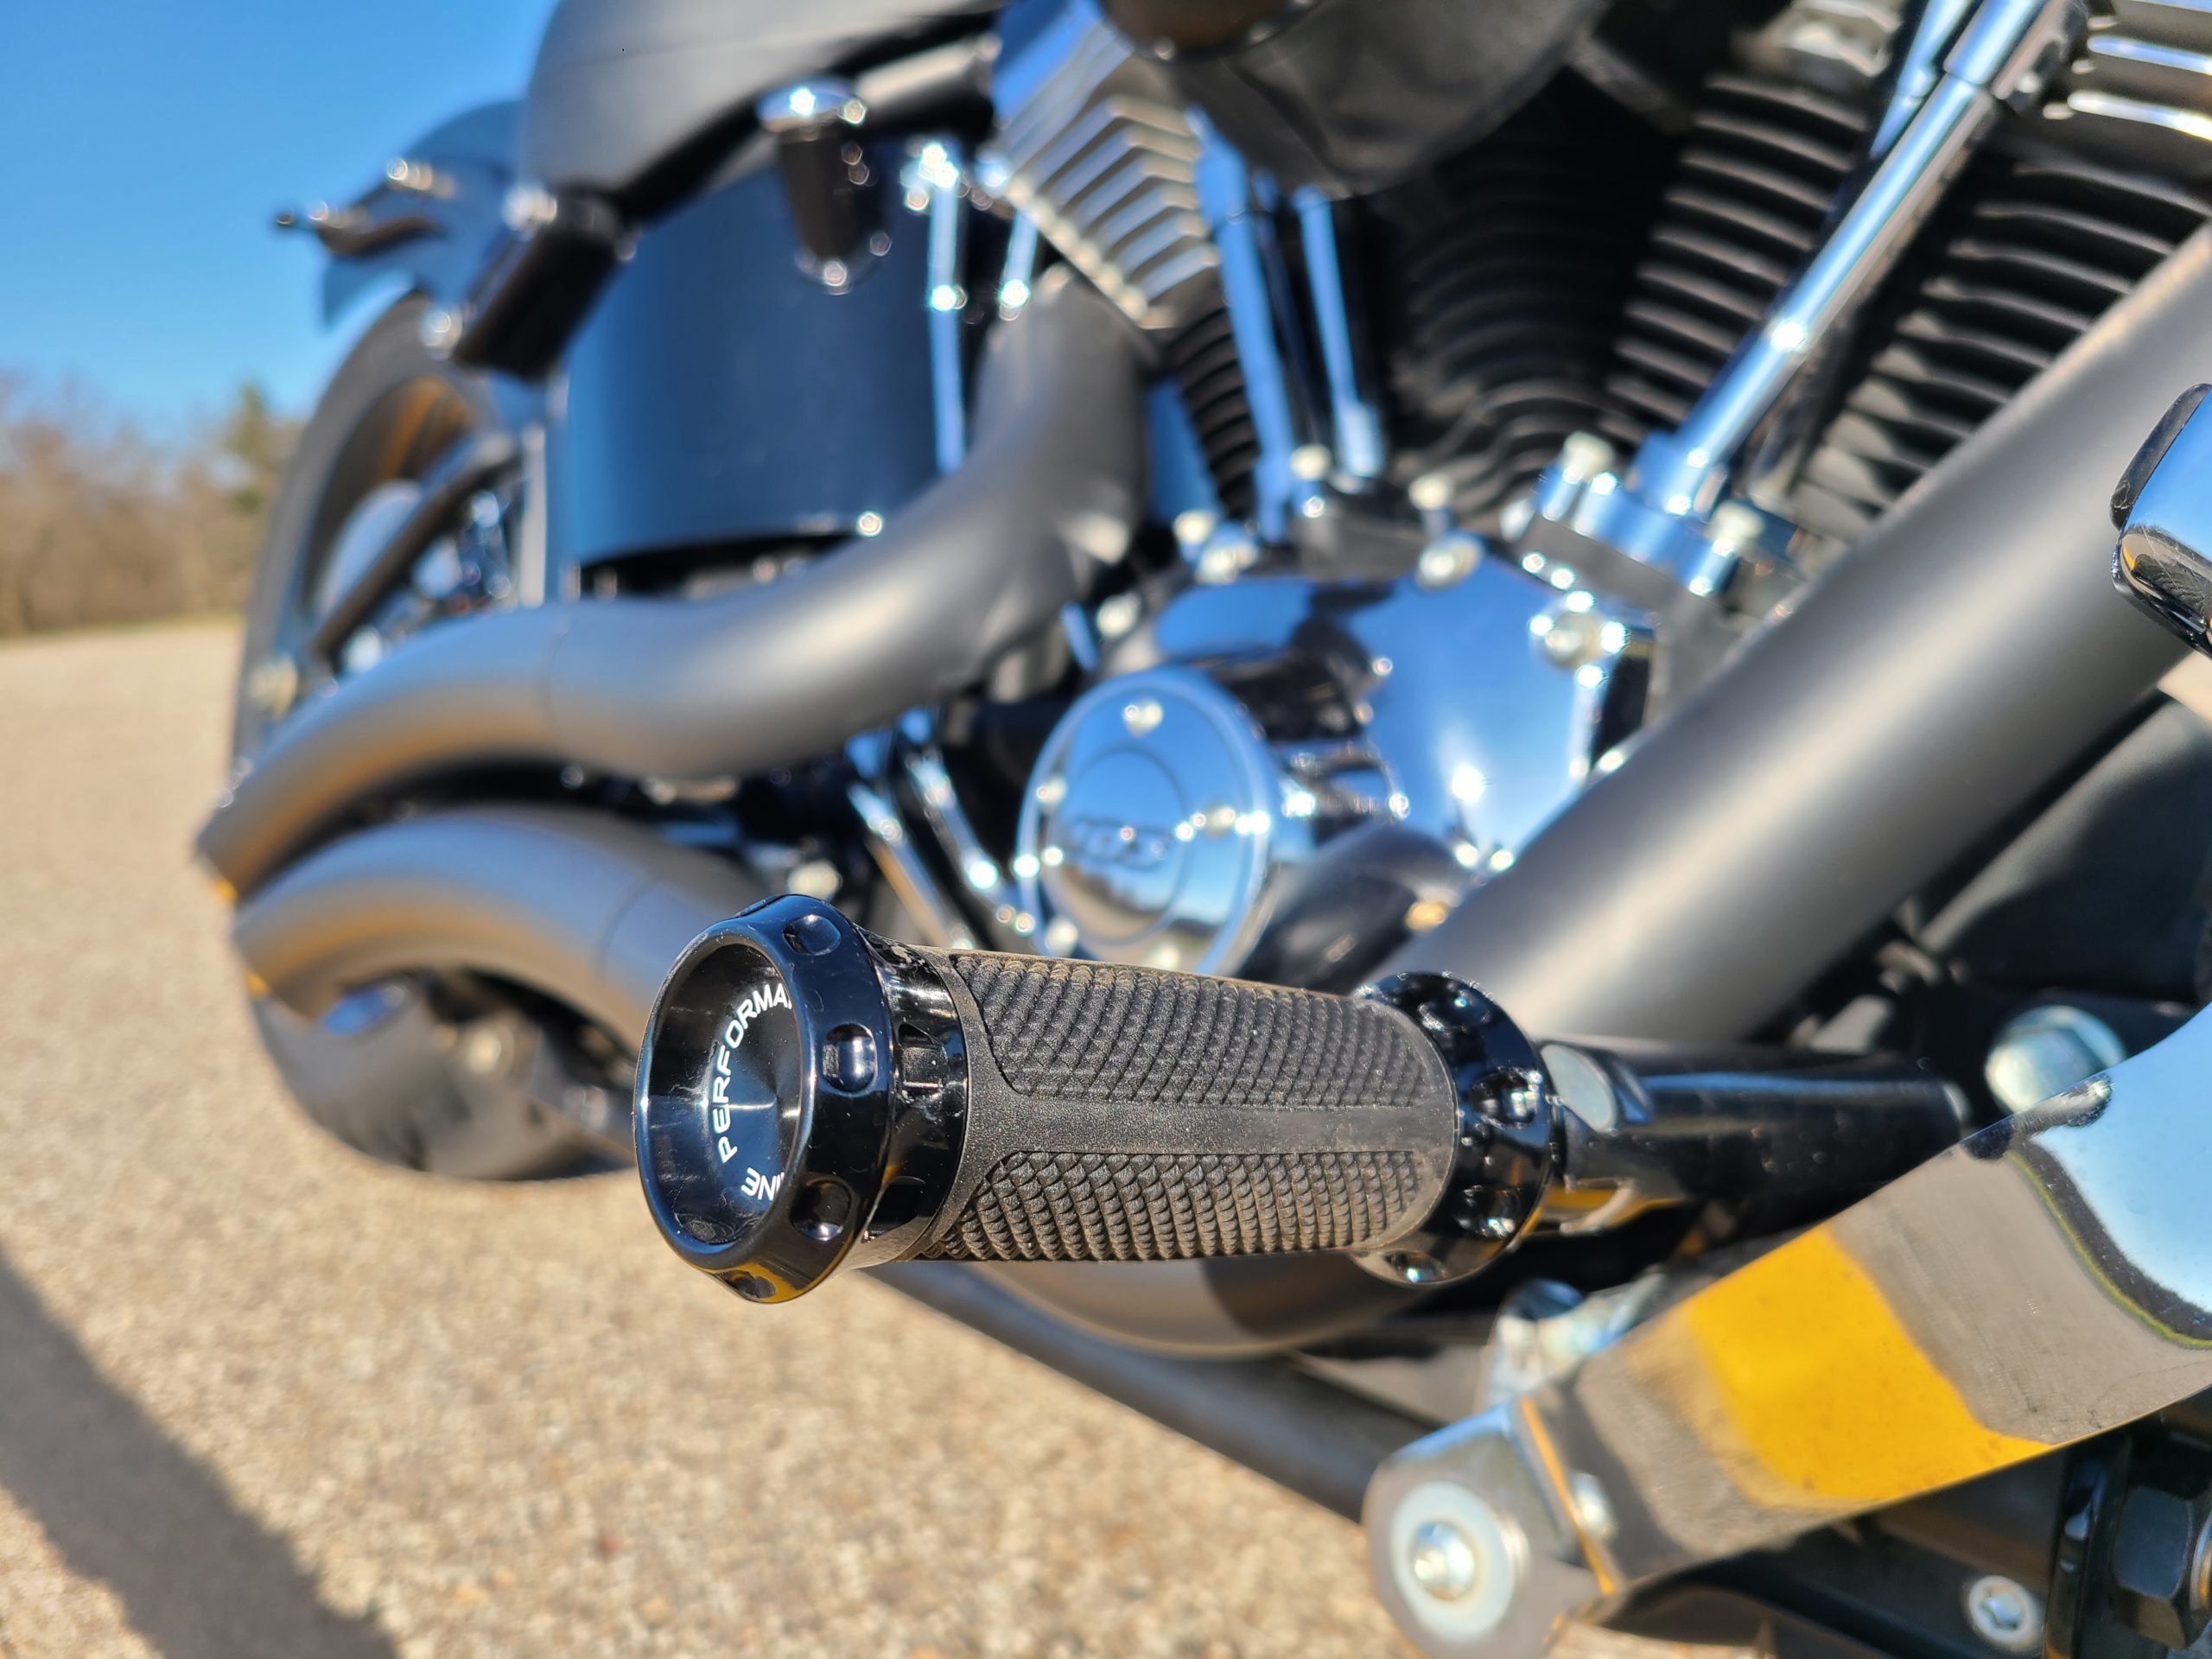
Speaking of pegs, after 10 years in the Georgia heat and sun the factory pegs wre starting to show their age and the rubber was becoming… slick. Because my boots wouldn’t stay on the pegs, I found myself being aware of holding my feet on them or pushing forward to keep my feet in place. An unnecessary distraction. I figured I was gonna change the pegs eventually, just for beauty if nothing else. Turns out, function matters, too.
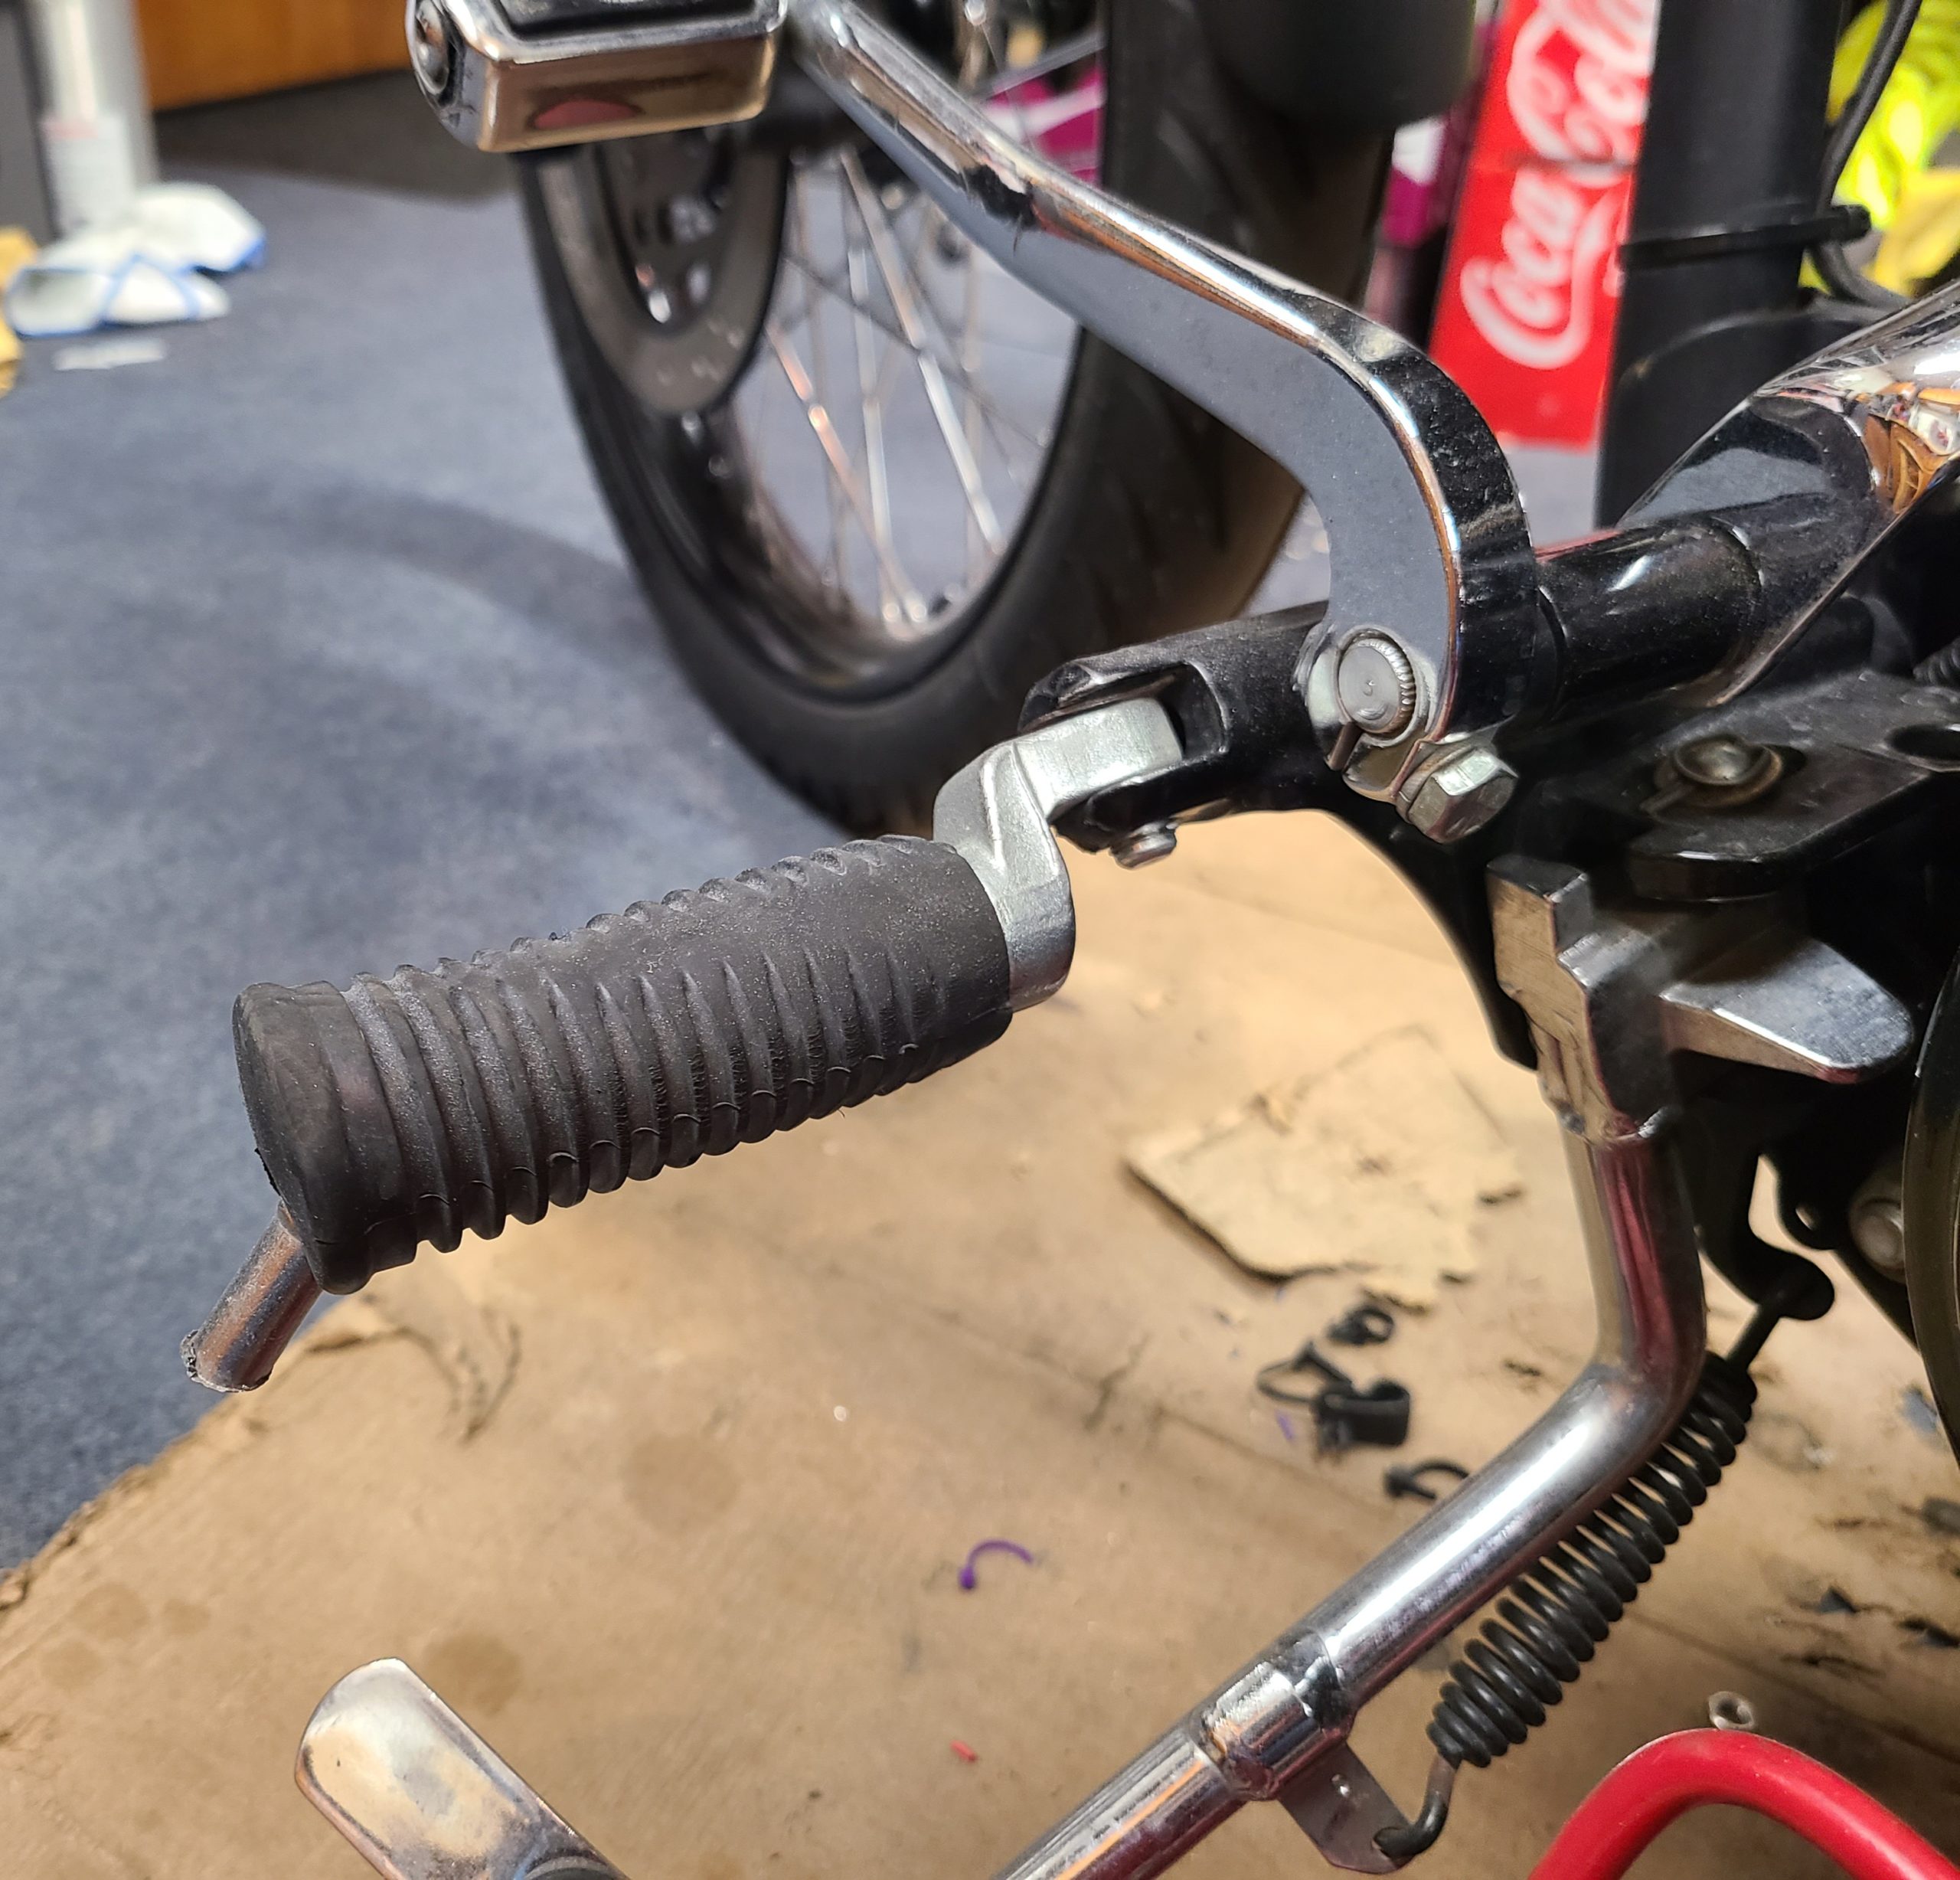
Looking at options, there was lots of chrome, points, spikes and skulls to choose from. None of that would go with the theme I was building. Then I found Performance Machine Overdrive Pegs. Simplistic and classy with their gloss/flat black contrast and a low key logo. I couldn’t order them fast enough.
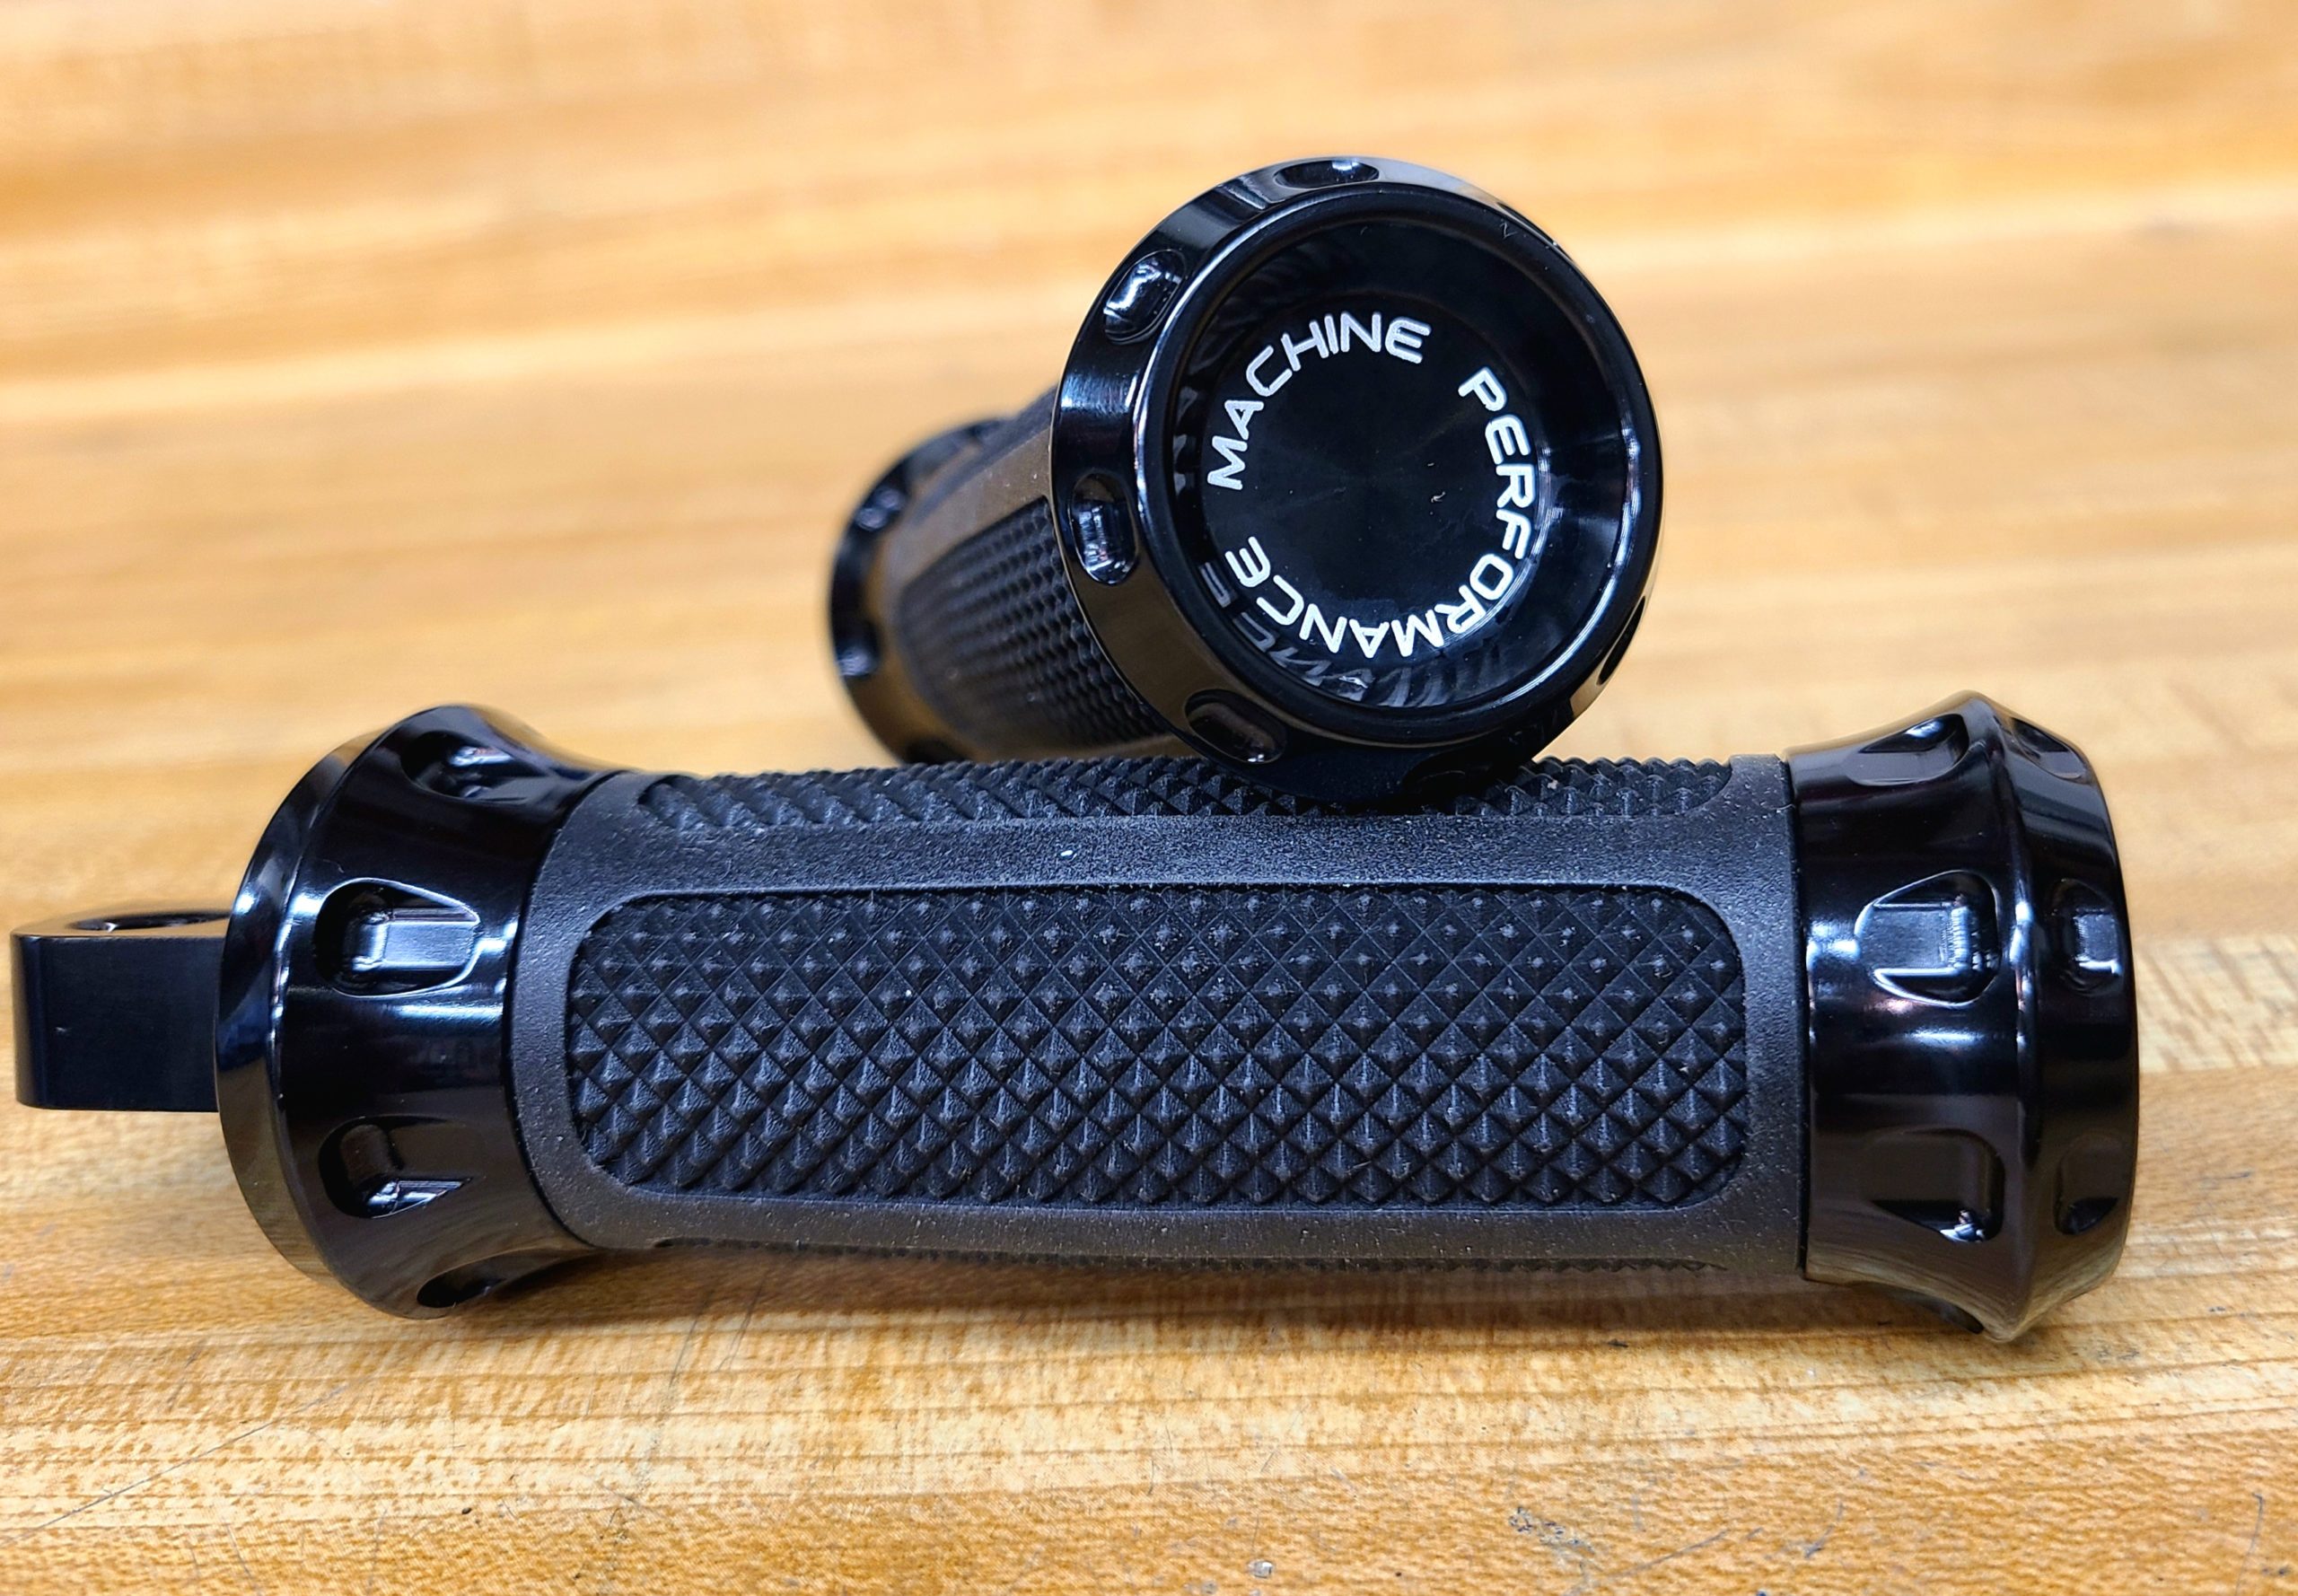
I’ll be honest, I never thought I’d have much to say about a peg. It’s a pokey bit to hang your boot on, right? Aside from how they look, I didn’t think there was any more to it. Well…. Still learning new things. The first ride with the Performance Machine Overdrive pegs proved a night and day difference. It felt like my boot was stuck to the pegs. In fact I didn’t realize how much effort I’d been putting into keeping my feet on the pegs while riding. That is, until I didn’t have to put any effort into it any longer. The difference in these pegs from the worn factory ones is stunning. I’m now the annoying guy in the shop telling everyone they need get new pegs and, “Trust me, it makes more of a difference than you could ever believe.”
The install was simple enough. Just a small snap ring that is easy to get with a small screwdriver while engaging the safety squints. Knock the pin out and catch the spring shim. Re-assemble with the new peg, and done. Takes 10 minutes to install, 30 minutes if you try to find the right snap ring pliers. (Side note, why are the snap ring pliers always missing the tip you need?) Once they’re installed, admire your work and go for a ride. Thank me later when you notice how much a simple peg swap can change the ride.
Now that I’m happier with how the bike looks, I can comfortably reach the bars, my ass isn’t falling asleep and my feet aren’t falling off the bike, it’s time to make it a bit more fun to ride. Next, I’ll be finishing the Stage 1 performance upgrade with a Vance and Hines Rogue intake and FuelPak tuner to go with the pipes that came on the bike. Then I’m moving on to cams, heads, and clutch upgrades to replace the worn original parts and add a little scoot to boot.
Not one to just make something look flashy or pretty, I’m gonna get inside the engine and see how much fun I can build into a 30K-mile Twin Cam. It’s either gonna be reliably fun, or a spectacle of poor decisions and broken parts. Stick around, this could get interesting…


More Stories
DUNLOP NAMED OFFICIAL TIRE SUPPLIER FOR HARLEY-DAVIDSON BAGGER WORLD CUP
Harley-Davidson Reflective Rain Suit: Baptized by Ice Before It Ever Saw Europe
THE FOLDS OF HONOR RE-MANUFACTURED MOTORCYCLE BY JOHNNY MAC’S CHOPPER HOUSE